Bedrock Editor
| Author(s) | |
|---|---|
| Platform(s) |
|
| Written in |
|
| Latest version | |
| Release date |
Preview: March 8, 2023 |
| Size |
Same as Bedrock Edition and Minecraft Preview. |
| Source available |
No |
| Links |
|
{
    "title": "Bedrock Editor",
    "rows": [
        {
            "field": "\n* (link to File:Mojang Studios logo.svg article, displayed as 20px|link=Mojang Studios|alt=Mojang Studios logo) (link to Mojang Studios article, displayed as Mojang Studios) <small>[https://minecraft.net/credits (Credits)]</small>\n* (link to File:Xbox Game Studios.svg article, displayed as 25px|link=Xbox Game Studios|class=darkmode-invert) (link to Xbox Game Studios article, displayed as Xbox Game Studios)",
            "label": "Author(s)"
        },
        {
            "field": "(link to File:Windows wordmark.svg article, displayed as x20px|Windows|link=wikipedia:Microsoft Windows)",
            "label": "Platform(s)"
        },
        {
            "field": "(link to File:C++.svg article, displayed as x20px|C++|link=wikipedia:C++) (link to wikipedia:C++ article, displayed as C++)<br>Bedrock Codebase",
            "label": "Written in"
        },
        {
            "field": "'''Stable''': (link to Bedrock Editor_1.1.5 article, displayed as 1.1.5)<br>\n'''Preview''': (link to Bedrock Editor_1.1.9 article, displayed as 1.1.9)",
            "label": "Latest version"
        },
        {
            "field": "'''Preview:''' March 8, 2023<br>\n'''Stable:''' December 3, 2024",
            "label": "Release date"
        },
        {
            "field": "Same as ''(link to Bedrock Edition article, displayed as Bedrock Edition)'' and ''(link to Minecraft Preview article, displayed as Minecraft Preview)''.",
            "label": "Size"
        },
        {
            "field": "No",
            "label": "<span style=\"white-space:normal\">Source available</span>"
        },
        {
            "field": "\n* [https://learn.microsoft.com/minecraft/creator/documents/editoroverview Documentation]<br>\n[https://github.com/Mojang/minecraft-editor GitHub Repository Website]",
            "label": "Links"
        }
    ],
    "invimages": [],
    "images": [
        "Bedrock Editor.png"
    ]
}
The Bedrock Editor, also referred to as Minecraft: Bedrock Editor or simply the Editor, is an in-game tool that can be used to edit worlds through projects. It is customizable through the use of scripting.
Launching
The Bedrock Editor uses the same app as Minecraft and Minecraft Preview, in the "Editor" state. It can be opened from the "Creator Tools" tab in the Bedrock Edition section of the Minecraft Launcher. A desktop shortcut can be created to launch the Editor directly without opening the Minecraft Launcher. This should be an internet shortcut with minecraft://creator/?Editor=true for the stable version, or minecraft-preview://creator/?Editor=true for Preview.
Opening the Bedrock Editor can also be done by pressing ⊞ Windows + R, and entering minecraft://creator/?Editor=true for the stable version, or minecraft-preview://creator/?Editor=true for Preview.
Bedrock Dedicated Server can also enable the Editor for clients. To launch BDS with the Editor, enter bedrock_server.exe Editor=true in a command prompt. This will create a new project on the server, and only works if the server doesn't contain any worlds. An existing project can be applied to a server by adding the project to the server's worlds folder and specifying the world name in server.properties. Only players on an Editor client can join compatible servers with a project to edit on the server.
Usage
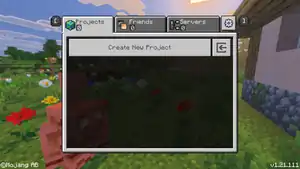
Using the tool starts with creating a new Project. A project is similar to a world, but a project is not "played" until it is exported, and stays in the initial creation state during editing, meaning that several world options such as the bonus chest can still be enabled after editing. Achievements are always disabled for projects and worlds created with the project.
New projects can be created from the main menu. All existing projects are shown in the "Projects" list, with the options to edit a project, create a new project, or import a world file. The player can join multiplayer projects from the "Friends" tab or join external servers from the "Servers" tab. The settings icon in the top-right opens the same settings menu as in regular gameplay. Pressing a project in the list opens the editor for that world.
Creating a new project has the same options as a new world in Minecraft, with the exception of Hardcore mode and Marketplace add-ons. The world type option has one additional preset, "Void world", which generates an empty world across all dimensions with a small grass block platform in the Overworld.
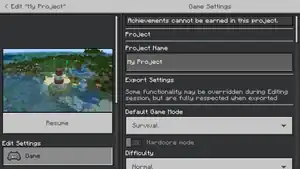
Editing a project has the same options as the regular edit world screen (see World Options § Classic UI), but these options affect the world only in test mode or for exporting. The edit world screen allows add-ons and experiments to be enabled, which can't be done from the Editor. A project can also be exported as project file to import it in the Editor, as world file to import it in Minecraft, or as template to import its world settings and add-ons.
GUI
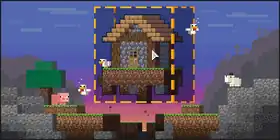
.png)
The Editor GUI uses Ore UI, and consists of several bars on the sides. Windows and pop-up bars can be closed and adjusted in scale and position towards the world preview. Several options and buttons have blue tooltips that appear when hovering over the option. These show hotkeys, a short description of the option, and sometimes a video explaining the feature.
The statistics bar at the bottom shows some coordinates[more information needed] and the ID of the hovered block.
The menu bar on the top has five tabs with options. Unless stated else, each of these buttons opens the respective window on the right side. See the respective sections below for more information about the functions.
File
Contains a list of actions and settings that handle the project.
- Test World
- Export
- Publish to Realms
- Settings
- Save & Quit
- Saves the project and returns to the main menu.
Edit
Contains a list of actions used to add and remove things from the world.
- Undo (Ctrl + Z)
- Undos the latest action performed in the Editor.
- Redo (Ctrl + Y)
- Reverts an undo action.
- Cut (Ctrl + X)
- Copies the selected blocks/entities to the clipboard and removes them.
- Copy (Ctrl + C)
- Copies the selected blocks/entities to the clipboard.
- Delete (Del)
- Deletes the selected blocks/entites. Blocks are replaced with air.
- Deselect (Ctrl + D)
- Deselects a selected area.
- Fill (Ctrl + F)
- Fills the selected area with the block selected in the hotbar.
View
Contains a list of options to show menus in the Editor.
- Game menu (Ctrl + Q)
- Closes the Editor GUI and opens the pause menu. The pause menu looks similar to the pause menu in Minecraft but the Marketplace, profile screen and Dressing Room are inaccessible.
- Log Panel (Ctrl + H)
- Jigsaws[upcoming BE 1.21.120]
World
Contains a list of options that change the attributes of the world.
- Pause Entities
- Toggles to pause all entity movements and suspend their AI.
- Navigation Panel
- Locate (Ctrl + ⇧ Shift + L)
- Time of Day
- Weather
- Opens a sub-menu to set the current weather to clear, rain, or thunder.
- Dimensions
- Opens a sub-menu to teleport the player to the Overworld, the Nether, or the End.
- Vibrant Visuals Settings
Help
Contains a list of resources and information to teach about the Editor.
- Tutorial
- Quick start
- Documentation
- Opens the official documentation page for the Editor.
- Feedback
- Opens the feedback post about the Editor.
- Samples
- Opens the Editor samples page on GitHub.
Action bar
The action bar is located below the menu bar and contains buttons on the left and right side. On both sides, a set of buttons can be selected for quick actions. If there are more buttons than space on one side, a button appears to switch between pages. Right-clicking a button or selecting the triangle in the bottom-right opens the button selection panel with an option to remove the button. Most of these buttons are also available from the menu bar above. The available buttons are:
- Attach Debugger
- Connects or listens to the script debugger, configurable in the settings. Connection status can be found in the Log Panel.[more information needed]
- Copy
- Crosshair Mode
- Cut
- Export
- Fill
- Hotbars
- Jigsaws
- Keyboard Settings
- Locate
- Navigation Panel
- Publish to Realms
- Redo
- Reload
- Reloads all script files for behavior packs and refreshes UIs for all clients.
- Settings
- Structures
- Test World
- Undo
- Vibrant Visuals
Hotbar
.png)
.png)
.png)
In the middle of the action bar is the block hotbar, which is used for several placing and filling actions. A block in the hotbar can be selected using the 1-9 hotkeys, or by selecting a block. Double-clicking a slot opens a pop-up to pick a block.
The block picker shows in which block the slot changes, with a list of all blocks below. The list shows the inventory icon as well as the ID, and can be filtered with a searchbar above. The list can also be sorted by color, and the exact color can be picked with a HEX graphical color picker. There is also a recently used tab below.
The block picker allows to switch the hotbar slot to a list of blocks. Lists are shown in the "Hotbar" window on the right, per hotbar slot. When performing an action with a list, such as filling, the blocks will be randomly selected from the list. The weight of each block can be adjusted, and blocks can be added or removed to a list.
With the menu button next to the hotbar, a set hotbar can be saved to a name. Saved hotbars can be selected from this menu or with the arrow buttons next to the hotbar. A saved hotbar can be overwritten with the selected hotbar with the "Save to Hotbar" option. The "Hotbar" window on the right can be opened to change hotbars and lists.
World preview
The world preview can be highlighted with Ctrl + Tab ↹ (viewport focus). The camera can be moved by moving the mouse while holding right click. Horizontal movement is done through W, A, S, and D. Vertical movement is done through E (up) and Q (down).
Scrolling on the mouse moves the camera in the facing direction. The camera can be dragged over the world by holding the middle mouse button and moving the mouse.
Selecting blocks and areas can be done with the selection tool by left-clicking. See § Tools below for more information.
Crosshair mode
Crosshair mode can be enabled on the action bar or with Ctrl + Tab ↹ twice, and simply opens the world in regular Creative mode. Crosshair mode can be left by pressing Esc or Ctr + Tab ↹. All features from Creative mode are available, including the hotbar and Creative inventory, but not certain GUIs and commands. Additionally, the player can phase through blocks like players in Spectator mode.
Quick Start and Tutorial
.png)
Upon first launch, the player is welcomed with a "Quick Start" window and a tutorial. Both can be opened at any time from the menu bar.
The Quick Start window has four tabs with a small overview of the GUI. The first tab shows links to the official documentation, feedback site, and Discord channel.
The tutorial consists of several pop-ups with tasks. After completion of all tasks (marked with a checkbox), the next tutorial pop-up opens. This tutorial shows some information about the GUI, controls, and the selection and brush tools.
World options
.png)
The Navigation Panel is used for the location of the camera in the world previewer. At the top, the "Show Map" option enables a map preview. The map preview uses the same layout and colors as in-game maps, but it is always centered around the player, with a marker. The map size can be adjusted between 64x64, 128x128, and 256x256 blocks. The map can be refreshed with a button below.
The players current XYZ location is shown below the map. By entering different values for the location, the player can teleport to any coordinates.
The Navigation Panel allows to store locations. The current location of the player can be stored with a custom name with the buttons at the bottom. Saved locations show as markers on the map, with a customizable color using a HEX graphical color picker. A single location can be selected in the panel, with the options to instantly teleport to that location or delete it.
Locate
.png)
The Locate window, opened with Ctrl + ⇧ Shift + L, allows to quickly perform the /locate biome command. A biome searchbar allows to quickly find a biome with the ID or display name.
Time of Day
.png)
The Time of Day Settings are used to quickly change the current in-game time. The time can be set to any integer or clock value, depending on the clock type used. The daylight cycle option can also be changed here. Below, a time preset (e.g. noon, sunset, midnight) can be selected, or the time can quickly be adjusted with a slider.
See § Test world below for more information about specific time options.
Tools
Tools can be selected from the left toolrail.
Selection
Brush Paint
Pencil
Paste Preview
Line
Ruler
Smart Fill
Terrain
Extrude
Repeater
Summon
Entity Inspector
Workbench
Farm Generator
Block Inspector
Scale
Test world
.png)
With the test world feature, the player can playtest the world with regular gameplay. Changes won't be saved (including options changed in the pause menu), and test world is only available in singleplayer. Cheats are enabled for test mode, and some settings can be changed before playing. The pause menu has an option to return to the Editor instead of leaving the game.
| Option | Description | Default |
|---|---|---|
| Game Mode | The game mode the player spawns with, between Survival, Creative, and Adventure. | Survival |
| Difficulty | The difficulty of the world, between Peaceful, Easy, Normal, and Hard. | Normal |
| Spawn at Current Location | Whether the player spawns at the current location of the camera in the Editor, or at the world spawn. | |
| Daylight Cycle | Changes the daylight cycle, between Normal, Always Day, and Lock Time. | Normal |
| Custom Time | Allows the current time to be changed to an integer when "Custom" is selected as time of day. | |
| Time of Day | Allows the current time to be changed to a time of the day between Current Time, Day, Noon, Sunset, Night, Midnight, Sunrise, and Custom. | Current Time |
| Weather Cycle | Whether the weather cycle is enabled and weather can change randomly. | |
| Weather | What type of weather is currently used, between Clear, Rain, and Thunder. | Clear |
| Show Coordinates | Whether the player's current coordinates are shown in the hotbar. | |
| Skip Night by Sleeping | Whether the night can be skipped by sleeping in a bed. | |
| Required Sleeping Players | The percentage of players in a bed required to skip the night. | 100 |
Export
.png)
The project can be exported as a world file from inside the Editor. There are several export options, some of which can also be changed from the pause menu or edit world screen. Options exclusive to the Editor are listed here. World options that are usually disabled after world creation are also available, including Hardcore, Starting Map, and Bonus Chest. Add-ons or experiments cannot be changed.
The /project command can also be used to export the project, with the world settings defined in the edit world screen.
Export Type
Allows the file extension to be changed, influencing how the world is imported in the Editor or in Minecraft. This can only be set to regular "Playable World" for now.
Initial Play Settings
| Option | Description | Default |
|---|---|---|
| World Spawn Point | Allows the world spawn to be changed with custom XYZ values, which can also be outside of the world. The button below can be used to set the world spawn to the current location of the camera. | X: 21 Y: 32767 Z: 118 |
| Starting Time | Allows the time upon first launch to be changed to a time of the day between Custom, Day, Noon, Sunset, Night, Midnight, and Sunrise. | Custom |
| Clock Type | Allows the time upon first launch to be changed to an integer. | Minecraft Clock |
| Custom Time | Allows the time upon first launch to be changed to an integer. | Normal |
| Starting Weather | Allows the weather upon first launch to be changed to Current Weather, Clear, Rain, or Thunder. | Clear |
Advanced Settings
| Option | Description | Default |
|---|---|---|
| Limited Crafting | Whether players can craft only those recipes that they have unlocked. | |
| Show Death Message | Whether a death message is shown in the chat when a player dies. Also affects whether a message is sent to the pet's owner when the pet dies. | |
| Show Item Tags | Hides the "Can place on" and "Can destroy" block lists from item lore, as well as item lock indicators. |
Cheats Settings
These settings are only available when cheats are enabled.
| Option | Description | Default |
|---|---|---|
| Command Block Output | Whether operators should be notified when a command block executes a command. | |
| Send Command Feedback | Whether command block output is shown in the chat. | |
| Max Command Chain Length | The maximum length of a chain of commands that can be executed during one tick. Applies to command blocks and functions. | 65535 |
| Fire Damage | Whether fire damage is applied to players. | |
| Freeze Damage | Whether freeze damage is applied to players. | |
| Fall Damage | Whether fall damage is applied to players. | |
| Drowning Damage | Whether drowning damage is applied to players. | |
| Insomnia | Whether phantoms can spawn in the nighttime. | |
| Show Border Effect | Whether border blocks display particles. | |
| Function Command Limit | The maximum number of commands that /function can execute.
|
10000 |
The "Export" button below instantly exports the world to the regular Minecraft world list. All options can be reset to their default state with a button next to it.
Publish to Realms
.png)
Projects can be exported as worlds to owned Realms servers. The "Publish to Realms" window has the same exportation options as when exporting a world, and the Realm and world slot can be selected. "Download" downloads the world currently stored on that slot to the device, and "Publish" replaces the selected slot with the world.
Settings
.png)
In addition to the game settings accessible from the main menu and the pause menu, some settings related to the Editor GUI can be changed here.
| Option | Description | Default |
|---|---|---|
| Move Speed Multiplier | The movement speed of the camera in the world preview. Can be set between 1 and 10. | 4 |
| Project cursor through liquid | Whether the cursor hovers over blocks behind bodies of liquids, or selects the liquids. | |
| Show Compass | Shows a compass in the world previewer, with the facing direction above. The compass shows which direction increases/decreases which coordinate value. | |
| Show Toast Notifications | Whether toast notifications are shown while in the Editor. | |
| Mute Music | Mutes all game music. | |
| Mute Game Sounds | Mutes all other game sounds. | |
| UI Scale | The scale adjustment of the Editor GUI. | 100% |
| Font | The scale of the font in the Editor GUI. | 100% |
| Theme | The theme used for the Editor GUI. Can be set to Dark, Light, Redstone, and High Contrast.
|
Dark |
| Night Vision | Enables the Night Vision effect for the camera in the world preview, without showing particles or the status indicator. | |
| Show Invisible Blocks | Whether invisible blocks are visible. | |
| Show Chunk Boundaries | Shows chunk boundaries. |
.png)
.png)
.png)
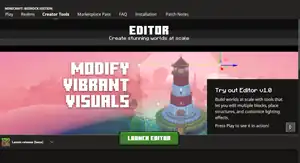
Vibrant Visuals Settings
.png)
Vibrant Visuals can be completely customized with resource packs, and the Bedrock Editor provides an interface to easily create Vibrant Visuals resource packs. Most configurations can be customized, excluding certain biome-dependent effects.
From the Vibrant Visuals Settings window, Vibrant Visuals can be enabled for the world previewer. Closing the window might reset some settings, so it is recommended to export the settings to the clipboard regularly. Vibrant Visuals settings are not saved for a project.
The Vibrant Visuals Settings has five tabs: Water, Global Lighting, Atmospheric Scattering, Color Grading, and Shadows.
The water settings allow the water color and fog color to be changed with three particle effects. Water caustics can be enabled and adjusted in length, power, and scale. An additional feature called "Waves" can be enabled and customized. This is not enabled in the default Vibrant Visuals and creates detailed animated wave effects on water surfaces. Many settings, such as depth, frequency, pull, shape, and speed can be adjusted.
Global lighting settings allows for customization of global light sources, including the sun, moon, and End flashes. The color spectrum, illuminance, and orbital offset can be adjusted and is previewed with graphical projections. Non-directional light sources, including emissiveness, ambient lighting, and sky lighting, can be customized in saturation, color, and intensity, respectively.
Atmospheric scattering allows customization of some atmospheric effects for the default atmospherics (excludes certain biomes), such as different sky colors. The strength, shape, and blending of scattering from directional light sources can also be adjusted.
Color grading changes how some color effects are changed as a post-processing effect. RGB values for different color grading aspects can be adjusted. Tone mapping can changed for multiple operators.
Shadow effects can be selected between the default "blocky" shadows and regular soft shadows. The texel size can be adjusted which changes the size of the shadow pixels.
For more information about individual values, see Vibrant Visuals § Customization.[more information needed]
All adjustments can be exported into a resource pack. The game automatically generates a resource pack which can be applied to the project, or other worlds without further modification.
Log Panel
.png)
Structures
Jigsaws
.png)
Keyboard Settings
.png)
Keybinds for almost all functions in the Editor can be customized. The Kyeboard Settings window can be opened only from the action bar, and lists all keybinds in several tabs. To change a keybind, select the input box and press a key to change it into that key. Right-clicking the keybind or clicking the button on the right clears the keybind. The second button on the right resets the keybind to the default state. Changes need to be saved with a button at the bottom, and all keybinds can be restored to their default state, or reset to the previously saved state.
Next to each keybind is an option to make the keybind "exclusive". This makes single-key actions activate only if no other modifiers are present, or if the specified modifier is used alongside the key. By default, all single keybinds are marked as exclusive.
Project
| Action | Default | Description |
|---|---|---|
| Delete | Delete | Replace all blocks inside a selection with air blocks. |
| Redo | Ctrl + Y | Redo a previous action. |
| Toggle Mode | Ctrl + Tab ↹ | Toggle between viewport focus, UI focus, and Crosshair mode. |
| Undo | Ctrl + Z | Undo a previous action |
Core Contexts
| Action | Default | Description |
|---|---|---|
| Tool Mode | ||
| Activate Ruler | Ctrl + ⇧ Shift + R | Activates the Ruler tool. |
| Block Inspector | Ctrl + ⇧ Shift + B | Activates the Block Inspector tool. |
| Brush Paint | Ctrl + B | Activates the Brush Paint tool. |
| Clear | Ctrl + D | Clears Selection volume. |
| Copy | Ctrl + C | Copys Selection to clipboard. |
| Cut | Ctrl + X | Copys Selection to clipboard and clears the volume. |
| Entity Inspector | Ctrl + ⇧ Shift + I | Activates the Entity Inspector tool. |
| Extrude | Ctrl + ⇧ Shift + E | Activates the Extrude tool. |
| Farm Generator | Ctrl + P | Activates the Farm Generator tool. |
| Fill | Ctrl + F | Fills Selection volume with the currently selected block or block list in the hotbar. |
| Line | Ctrl + L | Activates the Line tool. |
| Locate Biome | Ctrl + ⇧ Shift + L | Activates the Locate Biome tool. |
| Open Chat Window | / | Opens the chat window to send messages or use commands. |
| Paste | Ctrl + ⇧ Shift + V | Pastes clipboard at cursor position. |
| Paste Preview | Ctrl + V | Activates the Paste Preview tool. |
| Pencil | Space | Activates the Pencil tool. When Pencil is active, toggles between Brush Paint and Pencil. |
| Reload | Unassigned | Reloads all script files for behavior packs and refreshes UIs for all clients. |
| Repeater | Ctrl + R | Activates the Repeater tool. |
| Select Hotbar (1-9) | 1-9, respectively | Selects the respective slot of the hotbar. If the hotbar slot is already selected, this key opens the block picker. |
| Selection | Ctrl + S | Activates the Selection tool. |
| Show Game Menu | Ctrl + Q | Displays the pause menu, opened in Crosshair Mode. |
| Show Log Panel | Ctrl + H | Opens the log panel at the bottom of the screen. |
| Smart Fill | Ctrl + ⇧ Shift + M | Activates the Smart Fill tool. |
| Summon | Ctrl + ⇧ Shift + S | Activates the Summon tool. |
| Terrain | Ctrl + T | Activates the Terrain tool. |
| Viewport | ||
| Cursor Orbit Left | Z | Rotates the camera around the cursor in left direction. |
| Cursor Orbit Right | C | Rotates the camera around the cursor in right direction. |
| Decrease Fly Speed | ⇧ Shift + Q | Decreases the multiplier to fly speed of the camera in Tool Mode. Minimum multiplier of 1. |
| Fly To Cursor | G | Moves the camera to the location of the non-air block the cursor is on. If the cursor is on an air block, the camera moves 100 blocks forward. |
| Fly To Selection | Ctrl + ⇧ Shift + F | Moves the camera to the location of the nearest Selection volume. |
| Increase Fly Speed | ⇧ Shift + E | Increases the multiplier to fly speed of the camera in Tool Mode. Maximum multiplier of 10. |
| Move Back | S | Moves the camera backwards in Tool Mode. |
| Move Down | Q | Moves the camera downwards in Tool Mode. |
| Move Forward | W | Moves the camera forwards in Tool Mode. |
| Move Left | A | Moves the camera left in Tool Mode. |
| Move Right | D | Moves the camera right in Tool Mode. |
| Move Up | E | Moves the camera upwards in Tool Mode. |
| Selection Orbit Left | ⇧ Shift + Z | Rotates the camera around Selection in left direction. |
| Selection Orbit Right | ⇧ Shift + C | Rotates the camera around Selection in right direction. |
| Workbench Primary Action | + on numpad | Performs the action that is currently set to primary in the Workbench tool. |
| Workbench Quaternary Action | Ctrl + ⇧ Shift + + on numpad | Performs the action that is currently set to quaternary in the Workbench tool. |
| Workbench Secondary Action | ⇧ Shift + + on numpad | Performs the action that is currently set to secondary in the Workbench tool. |
| Workbench Tertiary Action | Ctrl + + on numpad | Performs the action that is currently set to tertiary in the Workbench tool. |
Modal Tools
The following keybinds are only available when the corresponding tool is activated.
| Action | Default | Description |
|---|---|---|
| Brush Paint | ||
| Cycle Block Target Mode | B | Cycles through block target modes (block or face). |
| Cycle Brush Mask | M | Cycles through brush mask modes (block filters). |
| Cycle Cursor Control Mode | T | Cycles between cursor control modes. |
| Move Cursor Back | ↓ | Moves the cursor backward. |
| Move Cursor Down | ⇟ Page Down | Moves the cursor downward. |
| Move Cursor Forward | ↑ | Moves the cursor forward. |
| Move Cursor Left | ← | Moves the cursor to the left. |
| Move Cursor Right | → | Moves the cursor to the right. |
| Move Cursor Up | ⇞ Page Up | Moves the cursor upward. |
| Nudge Offset | Ctrl + ⇧ Shift + respective move key. | Nudges the offset of the brush in the direction of the move key. Individual move keys are identical to the keys for "Move Cursor". |
| Paint | ↵ Enter | Paints blocks into the world by holding this button and moving the cursor. |
| Entity Inspector | ||
| Clear Selection | Ctrl + D | Deselects currently selected entity. |
| Line | ||
| Add to Selection (volume) | Alt + S | Adds current preview to existing selection volume. |
| Clear Selected | Ctrl + ⇧ Shift + ← Backspace | Removes selected line points. |
| Clears All | Ctrl + ← Backspace | Removes all line points. |
| Cycle Block Target Mode | B | Cycles through block target modes (block or face). |
| Cycle Cursor Control Mode | T | Cycles between cursor control modes. |
| Decrease Horizontal Weight | ⇧ Shift + ← | Decreases horizontal weight of the line. |
| Decrease Vertical Weight | ⇧ Shift + ↓ | Decreases vertical weight of the line. |
| Delete | Delete | Deletes all blocks selected by the line tool. |
| Fill | Ctrl + F | Fills blocks along the placed points of the line tool. |
| Increase Horizontal Weight | ⇧ Shift + → | Increases horizontal weight of the line. |
| Increase Vertical Weight | ⇧ Shift + ↑ | Increases vertical weight of the line. |
| Move Cursor | Respective move key | Moves the cursor in the direction of the move key. See Brush Paint above for individual move keys. |
| Move Selected | Ctrl + ⇧ Shift + respective move key. | Moves the selected control points in the direction of the move key. See Brush Paint above for individual move keys. |
| Select All | Ctrl + A | If one or more points are not selected, this selects all points on a line. If all points are selected, this deselects all points on a line. |
| Paste Preview | ||
| Clear Preview | Ctrl + D | Removes the clipboard item from the cursor. |
| Cycle Block Target Mode | B | Cycles through block target modes (block or face). |
| Cycle Cursor Control Mode | T | Cycles between cursor control modes. |
| Move Cursor | Respective move key | Moves the cursor in the direction of the move key. See Brush Paint above for individual move keys. |
| Move Origin | Ctrl + respective move key | Moves the origin point in the direction of the move key. See Brush Paint above for individual move keys. |
| Nudge Offset | Ctrl + ⇧ Shift + respective move key | Nudges the offset of the preview in the direction of the move key. See Brush Paint above for individual move keys. |
| Paste At Cursor | ↵ EnterCtrl + V | Pastes the preview at cursor position. |
| Rotate Preview Clockwise | R | Rotates the preview clockwise 90 degrees. |
| Rotate Preview Counter Clockwise | ⇧ Shift + R | Rotates the preview counter clockwise 90 degrees. |
| Toggle Mirror X | X | Mirrors the preview along the X axis. |
| Toggle Mirror Z | Z | Mirrors the preview along the Z axis. |
| Pencil | ||
| Cycle Block Target Mode | B | Cycles through block target modes (block or face). |
| Cycle Brush Mask | M | Cycles through brush mask modes (block filters). |
| Cycle Cursor Control Mode | T | Cycles between cursor control modes. |
| Move Cursor | Respective move key | Moves the cursor in the direction of the move key. See Brush Paint above for individual move keys. |
| Nudge Offset | Ctrl + ⇧ Shift + respective move key | Nudges the offset of the pencil in the direction of the move key. See Brush Paint above for individual move keys. |
| Selection | ||
| Cycle Block Target Mode | B | Cycles through block target modes (block or face). |
| Cycle Brush Mask | M | Cycles through brush mask modes (block filters). |
| Cycle Cursor Control Mode | T | Cycles between cursor control modes. |
| Grow Selection | ⇧ Shift + respective move key | Increases the size of the marquee selection in the direction of the move key. See Brush Paint above for individual move keys. |
| Hollow Selection | Unassigned | Creates a hollow selection volume. |
| Make Additional Selection | ⇧ Shift + ↵ Enter | Adds an additional selection volume to the world. |
| Make Selection | ↵ Enter | Adds a selection volume to the world. |
| Move Cursor | Respective move key | Moves the cursor in the direction of the move key. See Brush Paint above for individual move keys. |
| Move Selection | Alt + respective move key | Moves the selection volume in the direction of the move key. See Brush Paint above for individual move keys. |
| Nudge Offset | Ctrl + ⇧ Shift + respective move key | Nudges the offset of the selection volume in the direction of the move key. See Brush Paint above for individual move keys. |
| Shrink Selection | Ctrl + respective move key | Decreases the size of the marquee selection in the direction of the move key. See Brush Paint above for individual move keys. |
| Trim Selection (Bounds) | Unassigned | Reduces the selection so the bounds are touching at least one non-air block on each side. |
| Trim Selection (Remove Air) | Unassigned | Removes all air blocks from a selection. |
| Summon | ||
| Clear | Ctrl + D | Deselects selected entity. |
| Delete | Delete | Deletes selected entity. |
| Move Selected | Respective move key | Moves the selection entity in the direction of the move key. See Brush Paint above for individual move keys. |
| Terrain | ||
| Cycle Block Target Mode | B | Cycles through block target modes (block or face). |
| Cycle Brush Mask | M | Cycles through brush mask modes (block filters). |
| Cycle Cursor Mask | T | Cycles between cursor control modes. |
| Move Cursor | Respective move key | Moves the cursor in the direction of the move key. See Brush Paint above for individual move keys. |
| Nudge Offset | Ctrl + ⇧ Shift + respective move key | Nudges the offset of the brush in the direction of the move key. See Brush Paint above for individual move keys. |
| Switch Terrain Mode | ⇧ Shift + F⇧ Shift + D⇧ Shift + U | Switches between the different terrain modes (flatten, smoothen, roughen). |
Version history
Trivia
- In the first build (0.3), a link referenced as an example scripting pack was jokingly put in the code. The link redirects to Rick Astley's song "Never Gonna Give You Up".
Gallery
Screenshots
-
.png) The create new project screen.
The create new project screen. -
.png) The advanced tab.
The advanced tab. -
 The edit screen for a project.
Projects Tool Mobe
-
.png) The tool "Selection" tab.
The tool "Selection" tab. -
.png) The tool "Brush Paint" tab.
The tool "Brush Paint" tab. -
.png) The tool "Pencil" tab.
The tool "Pencil" tab. -
.png) The tool "Paste Preview" tab.
The tool "Paste Preview" tab. -
.png) The tool "Line" tab.
The tool "Line" tab. -
.png) The tool "Ruler" tab.
The tool "Ruler" tab. -
.png) The tool "Smart Fill" tab.
The tool "Smart Fill" tab. -
.png) The tool "Terrain" tab.
The tool "Terrain" tab. -
.png) The tool "Extrude" tab.
The tool "Extrude" tab. -
.png) The tool "Repeater" tab.
The tool "Repeater" tab. -
.png) The tool "Summon" tab.
The tool "Summon" tab. -
.png) The tool "Entity Inspector" tab.
The tool "Entity Inspector" tab. -
.png) The tool "Workbench" tab (Options).
The tool "Workbench" tab (Options). -
.png) The tool "Farm Generator" tab.
The tool "Farm Generator" tab. -
.png) The tool "Block Inspector" tab.
The tool "Block Inspector" tab.
Editor Entity
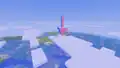
-
 The Location Pointer Idle entity.
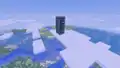
 -
 The Location Pointer Selected entity.
 -
 The Map Marker entity.
 -
 The Ruler entity.
 -
 The Ruler Idle entity.
See also
- Ore UI, the Bedrock Edition UI refresh
- Add-on
- Resource pack
References
- ↑ a b "Release v0.3: The Basics Update" – GitHub.
External links
Documentation
- Editor Overview
- Installation Guide
- Tutorial
- Action Bar
- Vibrant Visuals
- Keyboard Inputs
- Paste Preview
- Tool Mode
- Workflow
- World Options
- Building Editor Extensions
- More topics
- Script API
- Editor API
GitHub
Minecraft.net
Other
| Editions |
| ||||||
|---|---|---|---|---|---|---|---|
| Development |
| ||||||
| Technical |
| ||||||
| Multiplayer | |||||||
| Exclusive features |
| ||||||
| Removed | |||||||
| |||||||||||||||||||
| Internal versions | |||||||||||||||||||
| |||||||||||||||||||
| Underlined versions have been released outside of Preview | |||||||||||||||||||