Academy event
An academy event[1] (Japanese: アカデミーイベント Academy Event) is a type of limited-time event in Pokémon Masters EX. In these events, the player teams up with an academy sync pair and completes a series of battles at Pasio Academy to obtain special sync orbs to power up that sync pair. Each academy event also has featured units obtainable through the sync pair scout that allow the player to obtain extra sync orbs.
Overview
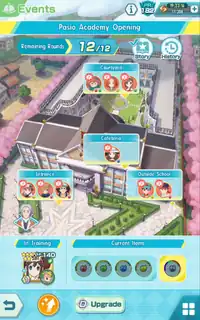
Upon opening an academy event for the first time, the player will play through a brief story area, at the end of which they recruit an academy sync pair. This sync pair starts at Level 140 and has 5★ potential, but it has low stats, only one move, and no passive skills. Additional stats, moves, and skills can be acquired by unlocking tiles on the pair's sync grid, which can only be done by obtaining unique sync-pair-specific sync orbs in their academy event. Academy sync pairs have a special sync grid called an in-training sync grid, which can only be used in academy event battles. An academy sync pair can only be used in battles outside the academy event once it has a completed sync grid.
The process of upgrading and completing an academy sync pair's sync grid is called an academy experience (Japanese: アカデミーライフ), which is divided into twelve rounds. In most rounds, eight to ten battles are randomly selected to appear in various locations around the academy. Different battles award different types and amounts of sync orbs for the academy sync pair, so players can choose which battles to take on based on which sync orbs they want to acquire. Battles can be quit and retried as many times as desired, but once the player completes a battle, the academy experience will advance to the next round and the area info will be refreshed. Players can complete battles using certain sync pairs on their team to multiply the amount of sync orbs received as rewards.
Occasionally, story segments will appear in addition to the battles. These come in two varieties, "Story" and "Look Around". Story stages involve a brief interaction between one or more characters, awarding a set number of sync orbs upon completion, while Look Around stages give the player either a choice of Trainers to talk to or a choice while talking to a single Trainer, awarding a random number of sync orbs, the type of which may change depending on the player's choices. Sync pair reward bonuses do not apply to Story or Look Around stages. Like battles, the academy experience will advance to the next round once a story segment is complete. However, if the player closes the game during a Story or Look Around stage, the academy experience will advance to the next round without giving the player their rewards. Most battles and story segments are available in all academy events, but each academy event has its own event-exclusive stages.
The sixth and twelfth rounds are special exam rounds: the sixth round is the midterm, and the twelfth round is the final. Exams are one-on-one battles where the player can only use the academy sync pair being trained in the event. Exams cannot be quit or restarted, and if the player loses, they will not receive any rewards. The player can choose one of three difficulties for the midterm exam and one of five difficulties for the final exam, with harder difficulties rewarding more sync orbs. The academy experience can be completed regardless of the outcome of the exams.
Once the final exam is completed, the epilogue becomes available. The player has the opportunity to modify their academy sync pair's in-training grid before playing the epilogue; the in-training grid can no longer be modified once the epilogue is completed. The content of the epilogue changes based on the academy sync pair's sync grid rank; if their grid rank is A or higher, the epilogue is a special story area unique to that academy event. If their grid rank is B or lower, the epilogue consists of a short conversation with Clavell in his office. The sync pair also receives a special title based on their grid rank at the end of their academy experience:
- Rank S or S+: Academy Superstar
- Rank A: Esteemed Elite
- Rank B: Buzzworthy Talent
- Rank C: Crowd-Pleaser
- Rank D: Sparkling Newbie
When an academy sync pair's academy experience is completed for the first time, its in-training grid becomes its completed grid. The in-training grid is reset for subsequent academy experiences, so in subsequent completions of the academy experience, the player can choose whether to keep the new, in-training grid or the old, completed grid. While making this decision, a trial battle is available where the player can try the academy sync pair in battle using either sync grid to compare them. Each time the player completes an academy experience, they receive 4 Custom ★ Power-Ups for the academy sync pair, so it can be raised to ![]() 6★ EX after completing the academy experience five times.
6★ EX after completing the academy experience five times.
List of academy events
| Event Name | Start Date | End Date | Academy Sync Pair | Featured Sync Pair(s) | Banner |
|---|---|---|---|---|---|
| Pasio Academy Opening | March 31, 2025 | April 17, 2025 | Rosa (Academy) & Deerling | Lacey & Granbull Rei (Academy) & Braviary |

|
| Pasio Paranormal Studies Club | April 15, 2025 | May 3, 2025 | Florian & Lechonk | Marnie (Academy) & Cyclizar Morty (Academy) & Typhlosion |

|
| Best Buddies Program | August 5, 2025 | August 23, 2025 | Brendan (Academy) & Marshtomp | Gladion (Academy) & Porygon-Z Iris (Academy) & Lapras |

|
Battles
The following battles can appear in all academy events. All these battles cost 20 stamina to complete. Some battles require another battle to have been completed in a prior round of a given academy experience in order for them to appear.
| Name | Difficulty | Location | Trainer(s) | Pokémon | Completion Rewards | Appearance Rate | Prerequisites | ||||
|---|---|---|---|---|---|---|---|---|---|---|---|
| Left | Middle | Right | |||||||||
| Train with Giacomo | Very Hard | Entrance |  Giacomo |
 Mightyena Weakness: |
 Kingambit Weakness: |
 Absol Weakness: |
10% | — | |||
| Train with Ortega | Very Hard | Entrance |  Ortega |
 Ribombee Weakness: |
 Dachsbun Weakness: |
 Comfey Weakness: |
10% | — | |||
| Volkner's Lesson | Super Hard | Entrance |  Volkner |
 Magnezone Weakness: |
 Luxray Weakness: |
 Electabuzz Weakness: |
10% | — | |||
| Fantina's Lesson | Super Hard | Entrance |  Fantina |
 Chandelure Weakness: |
 Mismagius Weakness: |
 Dusknoir Weakness: |
10% | — | |||
| Practice with an Ace Trainer 1 | Hard | Entrance |  Ace Trainer Jonathan |
 Kommo-o Weakness: |
 Garchomp Weakness: |
 Dragonite Weakness: |
10% | — | |||
| Practice with an Ace Trainer 2 | Hard | Entrance |  Ace Trainer Georgina |
 Sharpedo Weakness: |
 Camerupt Weakness: |
 Grimer Weakness: |
10% | — | |||
| Practice with a Poké Kid | Hard | Entrance |  Poké Kid Dromena |
 Psyduck Weakness: |
 Eevee Weakness: |
 Growlithe Weakness: |
10% | — | |||
| The Original Trio | Ultra Hard | Entrance |  Sygna Suit Leaf |
 Sygna Suit Red |
 Sygna Suit Blue |
 Venusaur Weakness: |
 Charizard Weakness: |
 Blastoise Weakness: |
5% | — | |
| Train with Rei | Very Hard | Large Lecture Hall |  Rei |
 Abomasnow Weakness: |
 Decidueye Hisuian Form Weakness: |
 Lucario Weakness: |
10% | — | |||
| Train with Bede | Very Hard | Large Lecture Hall |  Bede |
 Dracovish Weakness: |
 Hatterene Weakness: |
 Grimmsnarl Weakness: |
10% | — | |||
| Norman's Lesson | Super Hard | Large Lecture Hall |  Norman |
 Delcatty Weakness: |
 Slaking Weakness: |
 Bewear Weakness: |
10% | — | |||
| Elesa's Lesson | Super Hard | Large Lecture Hall |  Elesa |
 Gigalith Weakness: |
 Zebstrika Weakness: |
 Ampharos Weakness: |
10% | — | |||
| Three Friends from Kalos | Super Hard | Large Lecture Hall |  Trevor |
 Shauna |
 Tierno |
 Florges Orange Flower Weakness: |
 Chesnaught Weakness: |
 Crawdaunt Weakness: |
10% | — | |
| Practice with a Lass | Hard | Large Lecture Hall |  Lass Peggy |
 Drifblim Weakness: |
 Clefairy Weakness: |
Comfey Weakness: |
10% | — | |||
| Battle Nemona! 1 | Hard | Large Lecture Hall |  Nemona |
 Rhydon Weakness: |
 Lycanroc Midday Form Weakness: |
 Aggron Weakness: |
10% | — | |||
| Battle Nemona! 2 | Very Hard | Large Lecture Hall | Nemona |
 Turtonator Weakness: |
 Goodra Weakness: |
 Druddigon Weakness: |
15% | Complete Battle Nemona! 1 | |||
| Battle Nemona! 3 | Super Hard | Large Lecture Hall | Nemona |
 Machamp Weakness: |
 Pawmot Weakness: |
 Poliwrath Weakness: |
15% | Complete Battle Nemona! 2 | |||
| Geeta's Special Lesson | Ultra Hard | Large Lecture Hall |  Geeta |
 Salazzle Weakness: |
 Glimmora Weakness: |
 Gengar Weakness: |
5% | — | |||
| Train with Silver | Very Hard | Rooftop |  Silver |
 Darumaka Weakness: |
 Ho-Oh Weakness: |
 Magmar Weakness: |
10% | — | |||
| Train with Atticus | Very Hard | Rooftop |  Atticus |
 Probopass Weakness: |
 Revavroom Weakness: |
 Klinklang Weakness: |
10% | — | |||
| Skyla's Lesson | Super Hard | Rooftop |  Skyla |
 Pidgeot Weakness: |
 Swanna Weakness: |
 Braviary Weakness: |
10% | — | |||
| Winona's Lesson | Super Hard | Rooftop |  Winona |
 Swellow Weakness: |
 Pelipper Weakness: |
 Altaria Weakness: |
10% | — | |||
| Pasio Special Concert! | Super Hard | Rooftop |  Roxie |
 Piers |
 Toxtricity Amped Form Weakness: |
 Toxtricity Low-Key Form Weakness: |
10% | — | |||
| Practice with a Punk Girl | Hard | Rooftop |  Punk Girl Doris |
 Girafarig Weakness: |
 Espeon Weakness: |
 Xatu Weakness: |
10% | — | |||
| Alder's Special Lesson | Ultra Hard | Rooftop |  Alder |
Dragonite Weakness: |
 Volcarona Weakness: |
Altaria Weakness: |
5% | — | |||
| Team Rocket Infiltration! 1 | Hard | Rooftop |  Team Rocket Grunt |
 Zubat Weakness: |
 Golbat Weakness: |
 Fearow Weakness: |
10% | — | |||
| Team Rocket Infiltration! 2 | Very Hard | Rooftop | Team Rocket Grunt |
 Cubone Weakness: |
 Onix Weakness: |
 Graveler Weakness: |
15% | Complete Team Rocket Infiltration! 1 | |||
| Team Rocket Infiltration! 3 | Super Hard | Rooftop | Team Rocket Grunt |
 Seel Weakness: |
 Kabutops Weakness: |
 Starmie Weakness: |
15% | Complete Team Rocket Infiltration! 2 | |||
| Train with Elaine | Very Hard | Courtyard |  Elaine |
 Glaceon Weakness: |
 Eevee Weakness: |
 Umbreon Weakness: |
10% | — | |||
| Train with Penny | Very Hard | Courtyard |  Penny |
 Nidoran♀ Weakness: |
 Sylveon Weakness: |
 Emolga Weakness: |
10% | — | |||
| Milo's Lesson | Super Hard | Courtyard |  Milo |
 Appletun Weakness: |
 Eldegoss Weakness: |
 Butterfree Weakness: |
10% | — | |||
| Erika's Lesson | Super Hard | Courtyard |  Erika |
 Leavanny Weakness: |
 Vileplume Weakness: |
 Cottonee Weakness: |
10% | — | |||
| Practice with a Youngster | Hard | Courtyard |  Youngster Julius |
 Bellsprout Weakness: |
 Bulbasaur Weakness: |
 Oddish Weakness: |
10% | — | |||
| Practice with a Rising Star | Hard | Courtyard |  Rising Star Manon |
Clefairy Weakness: |
 Whimsicott Weakness: |
 Jigglypuff Weakness: |
10% | — | |||
| Train with Arven | Very Hard | Cafeteria |  Arven |
Appletun Weakness: |
 Mabosstiff Weakness: |
 Breloom Weakness: |
10% | — | |||
| Train with Serena | Very Hard | Cafeteria |  Serena |
 Vulpix Weakness: |
 Delphox Weakness: |
Magmar Weakness: |
10% | — | |||
| Siebold's Lesson | Super Hard | Cafeteria |  Siebold |
 Frillish Weakness: |
 Clawitzer Weakness: |
Pelipper Weakness: |
10% | — | |||
| Nessa's Lesson | Super Hard | Cafeteria |  Nessa |
Starmie Weakness: |
 Drednaw Weakness: |
 Seaking Weakness: |
10% | — | |||
| Practice with a Beauty | Hard | Cafeteria |  Beauty Eve |
 Liepard Weakness: |
 Honchkrow Weakness: |
 Persian Alolan Form Weakness: |
10% | — | |||
| Triple Trouble! | Super Hard | Cafeteria |  Cilan |
 Chili |
 Cress |
 Simisage Weakness: |
 Simisear Weakness: |
 Simipour Weakness: |
10% | — | |
| Cynthia's Special Lesson | Ultra Hard | Cafeteria |  Cynthia |
 Flygon Weakness: |
Garchomp Weakness: |
Flygon Weakness: |
5% | — | |||
| Train with Kris | Very Hard | Library |  Kris |
 Sandslash Weakness: |
 Feraligatr Weakness: |
 Hippowdon Weakness: |
10% | — | |||
| Train with Calem | Very Hard | Library |  Calem |
 Solrock Weakness: |
 Meowstic Weakness: |
 Lunatone Weakness: |
10% | — | |||
| Cheren's Lesson | Super Hard | Library |  Cheren |
 Watchog Weakness: |
 Stoutland Weakness: |
 Bouffalant Weakness: |
10% | — | |||
| Blaine's Lesson | Super Hard | Library |  Blaine |
 Flareon Weakness: |
 Rapidash Weakness: |
Magmar Weakness: |
10% | — | |||
| Professor Sycamore's Elite Team | Super Hard | Library |  Dexio |
 Professor Sycamore |
 Sina |
Espeon Weakness: |
 Xerneas Weakness: |
Glaceon Weakness: |
10% | — | |
| Practice with a Hex Maniac | Hard | Library |  Hex Maniac Luna |
 Dusclops Weakness: |
 Haunter Weakness: |
Mismagius Weakness: |
10% | — | |||
| Iris's Special Lesson | Ultra Hard | Library |  Iris (Alt.) |
 Houndoom Weakness: |
 Hydreigon Weakness: |
 Tyranitar Weakness: |
5% | — | |||
| Train with Nate | Very Hard | Schoolyard |  Nate |
Pidgeot Weakness: |
Braviary Weakness: |
 Staraptor Weakness: |
10% | — | |||
| Train with Eri | Very Hard | Schoolyard |  Eri |
 Hariyama Weakness: |
 Annihilape Weakness: |
 Sirfetch'd Weakness: |
10% | — | |||
| Korrina's Lesson | Super Hard | Schoolyard |  Korrina |
Lycanroc Midday Form Weakness: |
Lucario Weakness: |
 Arcanine Weakness: |
10% | — | |||
| Kabu's Lesson | Super Hard | Schoolyard |  Kabu |
Eldegoss Weakness: |
 Centiskorch Weakness: |
Drednaw Weakness: |
10% | — | |||
| Practice with a Pokémon Ranger | Hard | Schoolyard |  Pokémon Ranger Lena |
 Steenee Weakness: |
 Torterra Weakness: |
 Roserade Weakness: |
10% | — | |||
| Wally's Training 1 | Hard | Schoolyard |  Wally |
 Vibrava Weakness: |
Altaria Weakness: |
Flygon Weakness: |
10% | — | |||
| Wally's Training 2 | Very Hard | Schoolyard | Wally |
 Cacturne Weakness: |
Roserade Weakness: |
 Sceptile Weakness: |
15% | Complete Wally's Training 1 | |||
| Wally's Training 3 | Super Hard | Schoolyard | Wally |
 Jynx Weakness: |
 Gallade Weakness: |
 Medicham Weakness: |
15% | Complete Wally's Training 2 | |||
| Ingo and Emmet's Two-Car Train | Super Hard | Schoolyard |  Emmet |
 Ingo |
 Archeops Weakness: |
 Excadrill Weakness: |
10% | — | |||
| A Chance Encounter?! | Super Hard | Outside School |  Cheryl |
 Chansey Weakness: |
 Blissey Weakness: |
Chansey Weakness: |
10% | — | |||
| Team Skull Boss and Bodyguard | Super Hard | Outside School |  Gladion |
 Guzma |
 Plumeria |
 Silvally Weakness: |
 Golisopod Weakness: |
Salazzle Weakness: |
10% | — | |
| Let's Go to the Mountains! | Super Hard | Outside School |  Hiker Hunter |
Graveler Weakness: |
Graveler Weakness: |
Graveler Weakness: |
10% | — | |||
| Let's Go to the Beach! | Super Hard | Outside School |  Swimmer Maisie |
Seel Weakness: |
 Lapras Weakness: |
Seel Weakness: |
10% | — | |||
| A Reward from Lear | Super Hard | Outside School |  Rachel |
 Lear |
 Sawyer |
Lapras Weakness: |
 Hoopa Weakness: |
Honchkrow Weakness: |
10% | — | |
| Practice with a Sightseer | Hard | Outside School |  Sightseer Kaula |
Graveler Weakness: |
Sandslash Weakness: |
 Marowak Weakness: |
10% | — | |||
| Practice with a Black Belt | Hard | Outside School |  Black Belt Rhett |
Dusknoir Weakness: |
Hariyama Weakness: |
 Hitmonchan Weakness: |
10% | — | |||
| Practice with a Camper | Hard | Outside School |  Camper Roland |
 Spinarak Weakness: |
 Araquanid Weakness: |
 Ninjask Weakness: |
10% | — | |||
| Practice with a Swimmer | Hard | Outside School |  Swimmer Travis |
 Basculin Red-Striped Form Weakness: |
 Seismitoad Weakness: |
 Milotic Weakness: |
10% | — | |||
| Chatelaine Campaign 1 | Hard | Courtyard |  Evelyn |
None |  Entei Weakness: |
 Mantine Weakness: |
10% | — | |||
| Chatelaine Campaign 2 | Very Hard | Large Lecture Hall |  Morgan |
 Sawsbuck Spring Form Weakness: |
 Virizion Weakness: |
 Primeape Weakness: |
15% | Complete Chatelaine Campaign 1 | |||
| Chatelaine Campaign 3 | Super Hard | Cafeteria |  Dana |
Whimsicott Weakness: |
 Regice Weakness: |
 Wigglytuff Weakness: |
15% | Complete Chatelaine Campaign 2 | |||
| Chatelaine Campaign 4 | Super Hard | Schoolyard |  Nita |
 Landorus Weakness: |
15% | Complete Chatelaine Campaign 3 | |||||
| Lost Leon 1 | Hard | Library |  Leon |
Charizard Weakness: |
10% | — | |||||
| Lost Leon 2 | Very Hard | Courtyard | Leon |
Charizard Weakness: |
15% | Complete Lost Leon 1 | |||||
| Lost Leon 3 | Super Hard | Large Lecture Hall | Leon |
Charizard Weakness: |
15% | Complete Lost Leon 2 | |||||
The following battles were added beginning with the academy event Best Buddies Program.
| Name | Difficulty | Location | Trainer(s) | Pokémon | Completion Rewards | Appearance Rate | Prerequisites | ||||
|---|---|---|---|---|---|---|---|---|---|---|---|
| Left | Middle | Right | |||||||||
| Train with Juliana | Very Hard | Hallway |  Juliana |
 Exeggcute Weakness: |
 Sprigatito Weakness: |
 Venonat Weakness: |
10% | — | |||
| Train with Florian | Very Hard | Hallway |  Florian |
 Ponyta Weakness: |
 Fuecoco Weakness: |
Magmar Weakness: |
10% | — | |||
| Grusha's Lesson | Super Hard | Hallway |  Grusha |
Glaceon Weakness: |
 Cetitan Weakness: |
 Ninetales Alola Form Weakness: |
10% | — | |||
| Candice's Lesson | Super Hard | Hallway |  Candice |
 Purrloin Weakness: |
 Abomasnow Weakness: |
 Sneasel Weakness: |
10% | — | |||
| Rivals from Galar | Ultra Hard | Hallway | Bede |
 Marnie |
 Hop |
 Inteleon Weakness: |
 Cinderace Weakness: |
 Rillaboom Weakness: |
10% | — | |
| Steven's Special Lesson | Ultra Hard | Hallway |  Steven |
 Steelix Weakness: |
 Metagross Weakness: |
 Duraludon Weakness: |
5% | — | |||
| Practice with a Scientist | Hard | Hallway |  Scientist Gunner |
Liepard Weakness: |
 Toxicroak Weakness: |
 Nidoking Weakness: |
10% | — | |||
| Practice with a Poké Kid | Hard | Hallway |  Poké Kid Robin |
 Togedemaru Weakness: |
 Pikachu Weakness: |
 Heliolisk Weakness: |
10% | — | |||
| Train with May | Very Hard | Science Room |  May |
Clawitzer Weakness: |
 Swampert Weakness: |
 Floatzel Weakness: |
10% | — | |||
| Oleana's Lesson | Super Hard | Science Room |  Oleana |
Jynx Weakness: |
 Garbodor Weakness: |
 Parasect Weakness: |
10% | — | |||
| Colress's Training? | Ultra Hard | Science Room |  Colress |
Liepard Weakness: |
Klinklang Weakness: |
Watchog Weakness: |
10% | — | |||
| Samson's Impromptu Check | Ultra Hard | Science Room |  Kukui |
 Samson Oak |
Professor Sycamore |
Lycanroc Midday Form Weakness: |
 Exeggutor Alola Form Weakness: |
Bulbasaur Weakness: |
10% | — | |
The following battles are restricted to appearing only in certain rounds. "A Reward from Professor Kukui" can only appear from Round 1 to Round 5, while "A Reward from Director Clavell" can only appear from Round 7 to Round 11. Each battle can only be completed once during an academy experience, with its reward randomly selected each time it appears in a round. These battles normally have a 5% chance to appear in each round, but if the player has not completed the battle by its final round of availability—Round 5 for "A Reward from Professor Kukui" and Round 11 for "A Reward from Director Clavell"—it is guaranteed to appear. These battles cost 20 stamina to complete.
| Name | Difficulty | Location | Trainer | Pokémon | Rewards | ||
|---|---|---|---|---|---|---|---|
| Left | Middle | Right | |||||
| A Reward from Professor Kukui | Hard | Entrance | Kukui |
 Lycanroc Dusk Form Weakness: |
Lycanroc Midday Form Weakness: |
 Lycanroc Midnight Form Weakness: |
|
| A Reward from Director Clavell | Hard | Courtyard |  Clavell |
Pawmot Weakness: |
 Quaquaval Weakness: |
Annihilape Weakness: |
|
Trial battle
The trial battle is unlocked after the player completes an academy experience with an academy sync pair for a second time. The player chooses whether their academy sync pair will use its in-training grid or its completed grid before starting the battle in order to compare the two grids and decide which one they want to keep.
| Name | Difficulty | Trainer | Pokémon | Rewards | ||
|---|---|---|---|---|---|---|
| Left | Middle | Right | ||||
| Trial Battle | Normal | Clavell |
 Gyarados Weakness: |
Quaquaval Weakness: |
 Azumarill Weakness: |
None |
Stories
The following story interactions do not involve battles and each have a 5% appearance rate. They are also restricted to appearing in certain rounds.
| Name | Location | Trainer | Rewards | Rounds |
|---|---|---|---|---|
| Crack Open a Book! | Library |  Shauntal |
3–7 | |
| An Educational Talk | Large Lecture Hall |  Maxie |
3–7 | |
| A Lady's Preference for Elegance | Cafeteria |  Caitlin |
8–11 | |
| Stretched Too Far... | Roof |  Grant |
8–11 | |
| Pre-class Preparations...? | Schoolyard |  Klara |
8–11 |
Look Around
In the Courtyard, the player can find these events, which let the player look around and interact with specific trainers without battling them. The amount of rewards obtained is usually randomized, and the player's choices may affect the type of orb received. When one of these events is available, all four types of sync orb are listed as rewards, but their amounts are listed as a question mark. These events can only happen in certain rounds.
| Name | Trainer | Rewards | Rounds | Appearance Rate |
|---|---|---|---|---|
| Whosawhat's My Next Video? |  Iono |
3–11 | 5% | |
| Lance's Training Ground |  Lance |
3–11 | 5% | |
| What's Your Favorite Curry? |  Gloria |
3–11 | 5% | |
| Heads or Tails? |  Grimsley |
3–11 | 5% | |
| Brock's Rock Smash Training |  Brock |
Between 30 and 450 of one random orb type | 3–11 | 5% |
| A Present from Ball Guy |  Ball Guy |
One random orb type ×420 | 7–11 | 3% |
| N's Question |  N |
7–11 | 3% | |
| Professor Sycamore's Question | Professor Sycamore |
7–11 | 3% | |
| Professor Oak's Pokémon Lecture |  Professor Oak |
All orb types ×30 or ×400 | 7–11 | 1% |
| Blue's Special Training! |  Blue |
All orb types ×400 | 7–11 | 1% |
| Break Time Interaction 1 |  Lillie |
3–11 | 5% | |
 Marley |
||||
 Adaman |
||||
 Bugsy |
||||
| Break Time Interaction 2 |  Hau |
3–11 | 5% | |
 Burgh |
||||
 Whitney |
||||
 Sonia |
||||
| Break Time Interaction 3 |  Nanu |
3–11 | 5% | |
 Hilbert |
||||
 Raihan |
||||
| Break Time Interaction 4 |  Mela |
3–11 | 5% | |
 Jasmine |
||||
 Acerola |
In other languages
- Academy event
| |||||||||||||||||||||||||||
- Academy experience
| |||||||||||||||||||||||||||
References
- ↑ "Academy events are events you can play through to upgrade academy sync pairs. [...] In academy events, each action you take will use up a round and refresh area info." (Pokémon Masters EX, academy event tutorial)
Related articles
| ||||||||||||||||||||
| This article is part of Project Sidegames, a Bulbapedia project that aims to write comprehensive articles on the Pokémon Sidegames. |