How to Play/Legacy Console Edition

.png)
How to Play is a guide built into all versions of the Legacy Console Edition. It is intended to help new Minecraft players familiarize themselves with the controls of the game, as well as its various features and mechanics. The guide contains 33 pages in total (34 in the Xbox 360 Edition, and 35 in the PlayStation 4 Edition). It can be accessed at any time from the title screen or the pause menu, under the Help & Options section.
This article is a reproduction of the game's How to Play guide in its entirety, with some reformatting and internal linking as needed for optimal presentation as a wiki page. The controls shown in the guide vary between different consoles; as such, this article shows the default controls for both Xbox and PlayStation.
What's New
Village & Pillage (PlayStation 4)
- Added the Village & Pillage Update!
- Updated Villages.
- Villages have many new building types with biome specific architecture.
- Updated Villagers.
- Villagers now visit their job sites during the day and go home at night.
- Villagers take on new professions when near new job sites.
- Added new job site blocks.
- Some of these blocks can be used by both Villagers and players.
- Cartography Table: provides easier map crafting functionality.
- Grindstone: Used to repair weapons and tools plus disenchanting.
- Barrel: Stores items like a chest but can still be opened with blocks on top of it.
- Smoker: Cooks food much faster than a furnace.
- Blast Furnace: Provides faster ore smelting.
- Composter: Can be filled with crops to provide Bone Meal.
- Stonecutter: Easy crafting for stone and cobblestone items.
- Smithing table: A Villager only job site that cannot be used by players.
- Fletching table: A Villager only job site that cannot be used by players.
- Added the Wandering Trader.
- Added the Bell, When rung, all Villagers will run into their houses. Players can ring bells by interacting with them or powering them with redstone.
- Added the Pillager Outpost. Towers that contain dangerous enemies and loot!
- Added the Illager Captain.
- Added the Ravager. A powerful new enemy mob that can be ridden into battle by Illagers.
- Added Raids.
- When a player enters a Village with the Bad Omen effect a raid will be triggered.
- Pillagers will attack the Village in waves.
- Players that successfully defend a village from a raid will receive the Hero of the Village effect, giving a steep discount on trades with Villagers.
- Added the Campfire. This block can be used as a light source or for cooking.
- Added Sweet Berries. A new source of food found in Taiga biomes.
- Added Bamboo Jungle Biome. Bamboo is now generated in Jungles and more densely in Bamboo Jungles.
- Added new Trophies.
- "Buy Low, Sell High".
- "Disenchanted".
- "I've got a bad feeling about this".
- "Kill the Beast!".
- "Ring the Alarm!".
- "We're being attacked!".
Update Aquatic (Xbox 360, PlayStation 3, Vita and Wii U)
- Added the Update Aquatic! The oceans of Minecraft are now teeming with new life!
- Added Shipwrecks, Underwater Ruins, Coral Reefs, Icebergs, Underwater Caves/Ravines, and Buried Treasure to world generation.
- Added new blocks: Coral, Dried Kelp, Sea Pickles, Sea Turtle Eggs, Stripped Logs, Blue Ice, Prismarine Stairs, and Prismarine Slabs.
- Added new Kelp and Sea Grass underwater flora.
- Added Trapdoors, Pressure Plates, and Buttons for every type of wood.
- Added Bubble Columns that are created by underwater Magma or Soul Sand. Bubble Columns push players and mobs to the surface, or drag them under!
- Added the Conduit, a block that provides underwater players with a powerful Status Effect.
- Added Tridents, and their unique enchantments; Impaling, Channeling, Riptide, and Loyalty.
- Added other new items: Dried Kelp, Fish Buckets, Turtle Shell Helmet, Heart of the Sea, Nautilus Shell, Scute, and Phantom Membrane.
- Added new Potions and Arrows of the Turtle Master, and of Slow Falling.
- Added Buried Treasure Explorer Maps that will lead you to great wealth hidden under the sands!
- Added Cod, Salmon, Pufferfish, and 2700 types of Tropical Fish!
- Added the Dolphin, a friendly mob that helps players out!
- Added the Phantom, a mob that hunts down tired players.
- Added the Sea Turtle, a mob that travels the world but always returns home.
- Added the Drowned, a monster that attacks players that enter their underwater domain.
- Added new Warm, Lukewarm, and Cold Ocean biomes to hold all this new stuff…
- …And a new Tutorial world to show you how to use it!
World of Color Update (Xbox One and Nintendo Switch)
Basics
Minecraft is a game about placing blocks to build anything you can imagine. At night monsters come out, so make sure to build a shelter before that happens.
Use ![]() (Xbox) /
(Xbox) / ![]() (PlayStation) to look around.
(PlayStation) to look around.
Use ![]() /
/![]() to move around.
to move around.
Press ![]() /
/![]() to jump.
to jump.
Push ![]() /
/![]() forward twice in rapid succession to sprint. While you hold
forward twice in rapid succession to sprint. While you hold ![]() /
/![]() forward, you will continue to sprint until you run out of sprint time or have less than
forward, you will continue to sprint until you run out of sprint time or have less than ![]()
![]()
![]() .
.
Hold ![]() /
/![]() to mine and chop using your hand or whatever you are holding. You may need to craft a tool to mine some blocks.
to mine and chop using your hand or whatever you are holding. You may need to craft a tool to mine some blocks.
If you are holding an item in your hand, use ![]() /
/![]() to use that item or press
to use that item or press ![]() /
/![]() to drop it.
to drop it.
Multiplayer
Minecraft on the [console][a] is a multiplayer game by default. If you are playing in a High Definition mode, you can have local players join your game by attaching controllers and pressing ![]() /
/![]() /
/![]() /
/![]() at any point during the game.
at any point during the game.
When you start or join an online game it will be visible to people in your friends list (unless you've selected Invite Only when hosting the game), and if they join the game, it will also be visible to people in their friends list (if you have selected the Allow Friends of Friends option).
When you are in a game, you can press the ![]() /
/![]() /
/![]() /
/![]() button to bring up a list of all other players in the game, and Kick players from the game.
button to bring up a list of all other players in the game, and Kick players from the game.
HUD

The HUD shows information about your status; your health, your remaining oxygen, your hunger level, and your armor (if you are wearing any).
If you lose some health but have 9 or more ![]() , your health will automatically replenish. Eating food will replenish your
, your health will automatically replenish. Eating food will replenish your ![]() .
.
The Experience Bar is also shown here. The number shows your current Experience Level, and the bar indicates how many Experience Points are required to increase your Experience Level.
Experience Points are gained by collecting Experience Orbs. You can get Experience Orbs by:
The hotbar shows the items that are available to use. Use ![]() /
/![]() and
and ![]() /
/![]() to change the item in your hand.
to change the item in your hand.
Some items can be placed in your offhand slot for quick use; Maps will allow you to look at them while using something else, and Arrows in the offhand slot will be used first.
Battle Mini Game
Battle is a frantic last-man-standing fight to the death, where players will have to scavenge the arenas for chests containing weapons, armor, and food in order to survive and to have an advantage over other players.
The last player alive, or the player with the most kills when the level time ends, is the winner!
Gameplay
At the start of the game, the players are placed in a lobby area while other players are joining the game. Once there are a minimum number of players in the lobby, a timer will start; although if all players press ![]() /
/![]() to declare themselves ready the game will start immediately.
to declare themselves ready the game will start immediately.
Once the players enter the first arena, they will be locked to a podium position while everyone is loading and a timer will count down to the start of the game. Once the timer runs out, the players are released from their podiums, but will be invulnerable for a short time to allow them to find a weapon.
After the grace period, the battle begins!
Each round lasts a set time, or until there is only one surviving player. The game will then progress to the next arena, and all of the dead players will respawn.
Restrictions
In Battle, players are not able to build or mine; it's all about finding the weapons, armor, and food needed to survive!
Spectating
When a player dies, they will be able to watch the action as a spectator; either by following a surviving player, or by flying around the arena as a Bat, Parrot, Vex, or floating head!
Match Reports
At the end of a round, there will be a match report showing the statistics for the round.
Players will be awarded medals for their achievements (or lack of achievements) in the round.
Tumble Mini Game
Tumble is a fast paced last-man-standing mini game, where players try to destroy the blocks beneath the other players, causing them to fall into lava.
The last player alive in the level is the winner!
Gameplay
At the start of the game, the players are placed in a lobby area while other players are joining the game. Once there are a minimum number of players in the lobby, a timer will start; although if all players press ![]() /
/![]() to declare themselves ready the game will start immediately.
to declare themselves ready the game will start immediately.
Once the players enter the first arena, the game begins.
Each round lasts a set time, or until there is only one surviving player. The game will then progress to the next arena, and all of the dead players will respawn. Once a single player has won 3 rounds, players will be returned to the lobby.
Spectating
When a player dies, they will be able to watch the action as a spectator; either by following a surviving player, or by flying around the arena as a Bat, Parrot, Vex, or floating head!
Game Stats
At the end of a game, there will be a scoreboard showing the statistics for that game.
Players will be awarded medals for their achievements (or lack of achievements) in the game.
Glide Mini Game
Glide is a fast paced Elytra Mini Game. There are 2 variants:
Score Attack:
Fly through score rings to gain points. The player with the most points is the winner, but you still have to reach the end for your score to count!
Time Attack:
Speed is of the essence! The player who reaches the end in the fastest time is the winner.
Lobby
At the start of the game, the players are placed in a lobby area while other players are joining the game. Once there are a minimum number of players in the lobby, a countdown timer will start; although if all players press ![]() /
/![]() to declare themselves ready the game will start immediately.
to declare themselves ready the game will start immediately.
Gameplay – General
Glide is all about flying without power; you can gain speed by diving, but you'll stall if you climb too steeply.
In Glide you will find Thermals and Speed Boosts. There are 2 types of each:
Thermals
Fixed (White): These lift you up to a set height.
Natural (Blue): These lift you up based on your speed and angle; the longer you stay in a Natural Thermal, the more height you will gain.
Speed Boosts
Directional (Yellow): These boost you in the direction the arrows point.
Omni (Orange): These boost you in the direction that you are facing on entering.
Gameplay – Score Attack
In Score Attack the goal is to score as many points as possible by flying through rings. You still have to reach the end for your score to count.
Green Rings = 3 Points.
Yellow Rings = 5 Points.
Blue Rings = 7 Points.
The player who crosses the finish line with the most points wins. In case of a tie, the tied player with the fastest time wins.
Gameplay – Time Attack
In Time Attack, the goal is simply to reach the end as quickly as possible. The player with the single fastest time in any of the three rounds is declared the winner!
Hurry Up!
After any player finishes the course, a timer will start. The timer will be shortened every time another player reaches the end, so hurry up!
Solo
Glide can also be played Solo in either variant for practice; you can even restart the race by pressing ![]() /
/![]() , or go back to the last checkpoint by pressing
, or go back to the last checkpoint by pressing ![]() /
/![]() .
.
Checkpoints
When a player dies, they will respawn at the last checkpoint that they reached. Checkpoints are also marked by beacons – passing through a checkpoint will also flash "Checkpoint!" on screen, and play a sound. There is no limit to the number of times you can respawn, but the clock keeps running!
Game Stats
At the end of a game, there will be a scoreboard showing the statistics for that game.
Players will be awarded medals for their achievements (or lack of achievements) in the game.
Creative Mode

The creative mode interface allows any item in the game to be moved into the player's inventory without the need for mining or crafting the item. The items in the player's inventory will not be removed when they are placed or used in the world, and this allows the player to focus on building rather than resource gathering.
If you create, load or save a world in Creative Mode, that world will have achievements (Xbox) / trophies (PS) and leaderboard updates disabled, even if it is then loaded in Survival Mode.
To fly when in Creative Mode, press ![]() /
/![]() twice quickly. To exit flying, repeat the action. To fly faster, push
twice quickly. To exit flying, repeat the action. To fly faster, push ![]() /
/![]() forward twice in rapid succession while flying. When in flying mode, you can hold down
forward twice in rapid succession while flying. When in flying mode, you can hold down ![]() /
/![]() to move up and
to move up and ![]() /
/![]() to move down, or use
to move down, or use ![]() /
/![]() to move up,
to move up, ![]() /
/![]() to move down,
to move down, ![]() /
/![]() to move left, and
to move left, and ![]() /
/![]() to move right.
to move right.
Inventory

Press ![]() /
/![]() to view your inventory.
to view your inventory.
This screen shows the items that are available for use in your hand, and all of the other items that you are carrying. Your armor is also shown here.
Use ![]() /
/![]() to move the pointer. Use
to move the pointer. Use ![]() /
/![]() to pick up the item that is under the pointer. If there is more than one item here this will pick them all up, or you can use
to pick up the item that is under the pointer. If there is more than one item here this will pick them all up, or you can use ![]() /
/![]() to pick up just half of them.
to pick up just half of them.
You can place items down again by using ![]() /
/![]() . With multiple items on the pointer, use
. With multiple items on the pointer, use ![]() /
/![]() to place them all or
to place them all or ![]() /
/![]() to place just one.
to place just one.
If the item you are pointing at is armor, you can quick move it to the correct armor slot by pressing ![]() /
/![]() .
.
It is possible to change the color of Leather Armor by dyeing it. You can do this in the inventory menu by picking up the dye you want to use, then pressing ![]() /
/![]() while the pointer is over the piece of armor you want to dye.
while the pointer is over the piece of armor you want to dye.
Chests
Chest

Once you have crafted a Chest, you can place it in the world and then open it with ![]() /
/![]() to store items from your inventory.
to store items from your inventory.
Use the pointer to move items between your inventory and the chest.
Items in the chest will be stored there for you to swap back into your inventory again later.
Large Chest

Two chests placed next to each other will be combined to form a Large Chest. This can store even more items.
It is used in the same way as a normal chest.
Ender Chest

All Ender Chests in a world are linked. Items placed into an Ender Chest are accessible in any other. However, the contents of the Ender Chests are different for each player. This allows players to store items in any Ender Chest, and retrieve them from other Ender Chests in different positions in the world.
Crafting
Crafting
In the Crafting interface, you can combine items from your inventory to create new types of items. Use ![]() /
/![]() to open the crafting interface.
to open the crafting interface.
Scroll through the tabs at the top using ![]() /
/![]() and
and ![]() /
/![]() to select the type of item you wish to craft, then use
to select the type of item you wish to craft, then use ![]() /
/![]() to select the item to craft.
to select the item to craft.
The crafting area shows the items required to craft the new item. Press ![]() /
/![]() to craft the item and place it in your inventory.
to craft the item and place it in your inventory.
Scroll through the tabs on the left using ![]() /
/![]() and
and ![]() /
/![]() to switch between regular crafting, Banner crafting, and Firework crafting.
to switch between regular crafting, Banner crafting, and Firework crafting.
You can also use the 'Classic Crafting' interface by enabling this option in the Settings/User Interface menu. This will disable the automatic crafting of items, and instead use the method found in the Java version of Minecraft where you have to manually place ingredients in the right pattern in the grid to produce the item you want. More information on the patterns required is available on the Minecraft wiki page.
Crafting Table
You can craft larger items using a Crafting Table.
Place the table in the world and press ![]() /
/![]() to use it.
to use it.
Crafting on a table works in the same way as basic crafting, but you have a larger crafting area, and a more varied selection of items to craft.
Furnace

A Furnace allows you to change items by firing them. For example, you can smelt Iron Ore into Iron Ingots in the Furnace.
Place the Furnace in the world and press ![]() /
/![]() to use it.
to use it.
You need to put some fuel into the bottom of the furnace, and the item to be fired in the top. The furnace will then fire up and start working.
When your items have been fired, you can move them from the output area into your inventory.
If an item your inventory pointer is over is an ingredient or fuel for the furnace, you can quick move it to the correct slot by pressing ![]() /
/![]() .
.
Dispenser
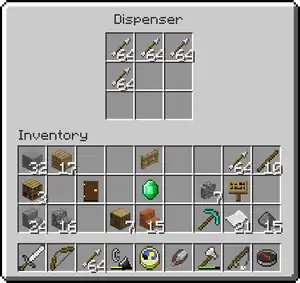
A Dispenser is used to shoot out items. You will need to place a switch (for example, a lever) next to the dispenser to trigger it.
To fill the dispenser with items press ![]() /
/![]() , then move the items that you want to dispense from your inventory into the dispenser.
, then move the items that you want to dispense from your inventory into the dispenser.
Now whenever you use the switch, the dispenser will shoot out an item.
Brewing

Brewing potions requires a Brewing Stand, which can be built at a crafting table. Every potion starts off with a bottle of water, which is made by filling a Glass Bottle with water from a Cauldron or water source.
A Brewing Stand has three slots for bottles, so can be used to make three potions at the same time. One ingredient can be used over all three bottles, so always brew three potions at the same time to best use your resources. Brewing Stands need fuel, so you'll need to acquire some Blaze Powder too.
Putting a potion ingredient in the top position of the Brewing Stand will make a base potion after a short time. This doesn't have any effect by itself, but brewing another ingredient into this base potion will give you a potion with an effect.
Once you have this potion you can add a third ingredient to make the effect last longer (using Redstone Dust), be more intense (using Glowstone Dust), or turn into a harmful potion (using a Fermented Spider Eye).
You can also add gunpowder to any potion to turn it into a Splash Potion, which can be thrown. The thrown Splash Potion will cause the potion effect to be applied over the entire area that it lands in.
By adding Dragon's Breath to a Splash Potion, you can make a Lingering Potion which leaves a gas cloud on the ground when thrown. Anything walking into this cloud will have the potion's effect applied to it.
The source ingredients for potions are :-
You'll need to experiment with combinations of ingredients in order to find out all of the different potions that you can make.
Enchantment

The Experience Points collected by picking up Experience Orbs can be used to enchant Swords, Bows, Axes, Pickaxes, Shovels, Armor, and Books.
When an Enchantable item is placed in the slot below the book in the Enchantment Table, the three buttons to the right of the slot will display some enchantments with their Experience Level cost and Lapis Lazuli cost.
If you do not have enough Experience Levels or have not provided enough Lapis Lazuli to use some of these, the relevant cost will appear in red; otherwise it will be shown in green.
The actual enchantment applied is randomly selected based on the cost displayed.
If the Enchantment Table is surrounded by Bookshelves (up to a maximum of 15), with a one block gap between the Bookcase and the Enchantment Table, arcane glyphs will be seen coming from the book on the Enchantment Table and the potency of the enchantments will be increased.
All of the ingredients for an Enchantment Table can be found within the villages in a world, or by mining and cultivation of the world.
Enchanted Books are used at the Anvil to apply enchantments to items. This gives you more control over which enchantments you would like on your items.
Anvil
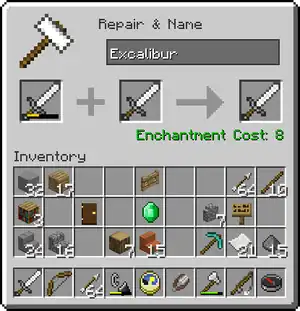
Experience Levels can be used to repair, enchant or rename items with the Anvil.
All items can be renamed, although only items with durability can be repaired or have enchantments from Enchanted Books applied to them.
An item can be repaired by placing it in one of the input slots on the left, along with either some raw materials of the item, like Iron Ingots for an Iron Sword, or combined with another item of the same type.
Combining items is more efficient when done with an Anvil, and additionally, if either of the items were enchanted, the finished product may have enchantments from either of the inputs.
Enchanted Books can apply enchantments to items by combining them at an Anvil if the Book's enchantment is suitable. Enchanted Books can be found in Chests within dungeons, or enchanted from normal Books at the Enchantment Table.
There is a chance that the Anvil will be damaged with each use and after enough punishment it will be destroyed.
Farming Animals

If you want to keep your animals in one place, build a fenced area of less than 20×20 blocks and have your animals inside it. This ensures that they will still be there when you come back to see them.
Breeding Animals

The animals in Minecraft can breed, and will produce baby versions of themselves!
To get animals to breed, you will need to feed them with the right food to get them to go into 'Love Mode'.
Feed Wheat to a cow, mooshroom, or sheep; Carrots or Beetroot to a pig; any kind of Seeds to a chicken; Carrots, Golden Carrots, or Dandelions to a rabbit; uncooked fish of any kind to an ocelot; or any kind of meat to a wolf; and they'll start looking for another nearby animal of the same species that is also in Love Mode.
When two animals of the same species meet, and both are in Love Mode, they will kiss for a few seconds – then a baby animal will appear. The baby animal will follow their parents for a while before growing into a full sized animal itself.
After breeding, an animal won't be able to enter Love Mode again for about five minutes.
There is a limit to the number of animals it is possible to have in a world, so you may find that animals don't breed when you have a lot of them.
Trading
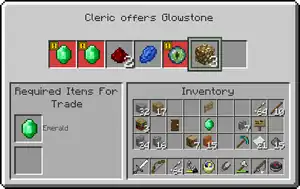
It is possible to trade items with villagers. Each villager has a profession; they can be Farmers, Butchers, Blacksmiths, Librarians or Priests, and this affects the type of items they might trade.
You can find a list of all the trades a villager is offering in the trading menu. A villager may modify or add to its trades whenever a player trades with it, although a trade might become temporarily disabled if it is used too frequently.
Trades usually involve buying or selling a number of items for emeralds.
If you do not have the items required for a trade, the items are shown in red.
Horses

Horses and Donkeys are found mainly in open plains and savannas. A Mule is the offspring of a Donkey and a Horse, and cannot breed. Llamas can only be found in Savannas and Extreme Hills.
A player can ride any adult Horse, Donkey, Mule, or Llama. Only Horses can be armored, and only Mules, Donkeys, and Llamas can be equipped with saddlebags for transporting items.
By using a Lead on a Llama, other Llamas will naturally follow and form long caravans that can haul large quantities of items at once. Llamas can also be clothed with carpets.
Horses, Donkeys, Mules, and Llamas must be tamed before they can be used. A player can tame a horse by riding it and staying on while it tries to buck them off. When Love Hearts appear around the horse, it has been tamed and will no longer attempt to throw the player off. To steer a horse, the player must equip it with a Saddle. Press ![]() /
/![]() to dismount from a horse.
to dismount from a horse.
Saddles can be bought from villagers or found inside Chests hidden in the world.
Tame Donkeys, Mules, and Llamas can be given saddlebags by attaching a Chest to them. These saddlebags can then be accessed whilst riding or sneaking.
Horses and Donkeys (but not Mules) can be bred like other animals using Golden Apples or Golden Carrots. Llamas can be bred using Hay Blocks.
Foals will grow into adults over time, although feeding them Wheat or Hay will speed this up.
Beacons
Active Beacons project a bright beam of light into the sky and grant powers to nearby players. They are crafted with Glass, Obsidian, and Nether Stars (which can be obtained by defeating the Wither).
Beacons must be placed so that they are in sunlight during the day. Beacons must be placed on Pyramids of Iron, Gold, Emerald, or Diamond.
The material that the Beacon is placed on has no effect on the power of the Beacon.
In the Beacon menu you can select one primary power for your Beacon. The more tiers your pyramid has the more powers you will be able to choose from. A Beacon on a pyramid with at least four tiers also gives the option of either the Regeneration secondary power or a stronger primary power.
To set the powers of your Beacon you must sacrifice an Emerald, Diamond, Gold Ingot, or Iron Ingot in the payment slot. Once set, the powers will emanate from the Beacon indefinitely.
Fireworks
Fireworks are single-use decorative items that can be launched by hand or from Dispensers. They are crafted with Paper and Gunpowder, but you can also add Firework Stars to give your Fireworks awesome explosions!
The colors, fade, shape, size, and effects (such as trails and twinkle) of Firework Stars can be customized by including additional ingredients when crafting.
You can craft a Firework or Firework Star in the standard 2×2 Crafting interface, but using a Crafting Table will let you add more ingredients for more impressive displays.
When in either crafting interface, switch to the Fireworks type by pressing ![]() /
/![]() twice.
twice.
First, create the Firework Stars you want by adding ingredients with ![]() /
/![]() to change the color, shape, and effect of the Firework Star, then pressing
to change the color, shape, and effect of the Firework Star, then pressing ![]() /
/![]() to create a Firework Star.
to create a Firework Star.
- A Dye will set the color of the explosion of the Firework Star.
- A Fire Charge, Gold Nugget, Feather, or Mob Head will set the shape of the explosion.
- A trail or a twinkle can be added using Diamonds or Glowstone Dust.
Remember that you don't need any Firework Stars to craft a Firework, but they are nice to have.
When you're done, hit ![]() /
/![]() to move on.
to move on.
Next, you can add Fade to as many Firework Stars as you'd like. Select the Firework Star you want to add a Fade to, then add dyes with ![]() /
/![]() to make that Firework Star fade to that color after exploding.
to make that Firework Star fade to that color after exploding.
When you've added as much Fade as you like, press ![]() /
/![]() to create the star, then
to create the star, then ![]() /
/![]() to move to the Firework Rocket Group.
to move to the Firework Rocket Group.
You can choose to add as many Firework Stars as you like to the crafting grid to add them to the Firework.
Filling more slots in the crafting grid with Gunpowder will increase the height at which all of the Firework Stars will explode.
Once you're done, press ![]() /
/![]() to craft your completed Firework!
to craft your completed Firework!
Banners
Banners are highly customizable decorations that can be placed either free standing, or attached to other blocks. To get started with banner crafting, open up a Crafting Table and switch to the Banners type by pressing ![]() /
/![]() .
.
You'll need some wool and a stick to craft the base of your banner; try using dyed wool for a more colorful base. Press ![]() /
/![]() when you have picked your base to start adding patterns.
when you have picked your base to start adding patterns.
Next, you can add up to 6 patterns to your banner to make it unique. The last pattern you select will always be on top, so make sure to add your backgrounds first. Remember that nothing is permanent until you press ![]() /
/![]() Create, so don't be afraid to experiment!
Create, so don't be afraid to experiment!
There are loads of patterns to play with, split into five different groups that you can navigate by pressing ![]() /
/![]() and
and ![]() /
/![]() .
.
Every pattern can be added in different colors using dyes, and some patterns require other items too.
Add a pattern by pressing ![]() /
/![]() , and when you're done press
, and when you're done press ![]() /
/![]() to add the completed Banner to your inventory!
to add the completed Banner to your inventory!
You can also copy a completed banner to a blank banner of the same base color, so don't worry about memorising how you made your favorites.
Hoppers
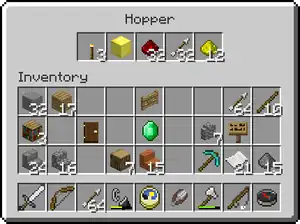
Hoppers are used to insert or remove items from containers, and to automatically pick up items thrown into them.
They can affect Brewing Stands, Chests, Dispensers, Droppers, Minecarts with Chests, Minecarts with Hoppers, and other Hoppers.
Hoppers will continuously attempt to suck items out of a suitable container placed above them. They will also attempt to insert stored items into an output container. If a Hopper is powered by Redstone it will become inactive and stop both sucking and inserting items.
A Hopper tries to output items in the direction it is pointing. To make a Hopper point to a particular block, place the Hopper against that block while sneaking.
Droppers

When powered by Redstone, Droppers will drop a single random item contained within them onto the ground. Use ![]() /
/![]() to open the Dropper and then you can load the Dropper with items from your inventory.
to open the Dropper and then you can load the Dropper with items from your inventory.
If the Dropper is facing a Chest or another type of container, the item will be placed into that instead. Long chains of Droppers can be constructed to transport items over a distance, but for this to work they will have to be alternately powered on and off.
Nether Portal

A Nether Portal allows players to travel between the Overworld and The Nether. The Nether can be used to fast-travel in the Overworld; traveling one block distance in The Nether is equivalent to traveling 3 blocks in the Overworld.
This means that if you build a second portal in The Nether and exit through it, you will be 3 times further away from your entry point than the distance that you walked.
A minimum of 10 Obsidian blocks are required to build a portal, and the portal needs to be at least 5 blocks high by 4 blocks wide.
Portals can be up to 23 blocks high by 23 blocks wide as long as they are rectangular.
Once the frame is built, the portal can be activated by igniting the interior of the frame. This can be done using the Flint and Steel item, or the Fire Charge item.
Examples of portal construction are shown in the picture to the right.
The End

The End is another dimension which can be reached through an active End Portal. The End Portal can be found in a Stronghold, which is deep underground in the Overworld.
To activate the End Portal, you'll need to put an Eye of Ender into every End Portal Frame block that doesn't have one.
Once the portal is active, jump into it to go to The End.
In The End you will meet the Ender Dragon, a fierce and powerful enemy, along with many Enderman. Make sure you are well prepared for the battle before going there!
Atop eight pillars of Obsidian, there are Ender Crystals that the Ender Dragon uses to heal itself. The first step in the battle is to destroy each of these. The first few can be reached with arrows, but several are protected by an Iron Fence cage; you will need to build up to them.
While you are doing this, the Ender Dragon will be attacking by flying at you and spitting balls of Ender Acid!
If you approach the Egg Podium in the centre of the spikes, the Ender Dragon will fly down and attack you. This is where you can really do some damage to it!
Avoid the acid breath, and target the Ender Dragon's eyes for the highest damage. If possible, bring some friends into The End to help you with the battle!
Once you are in The End, your friends will be able to see the location of the End Portal within the Stronghold on their maps, so they can easily join you.
End Cities
After killing the Ender Dragon, an End Gateway Portal will generate. Throwing an Ender Pearl into the portal will teleport you to an outer End island.
End Cities spawn on outer End islands, and contain some very valuable loot.
Exploring End islands is dangerous, though, so be sure to pack plenty of food and other useful items like Ender Pearls.
Elytra
Elytra are an item that can be equipped to allow gliding. Elytra are equipped in the chest slot, as if they were a piece of armor.
Elytra cannot be crafted, but are found in Item Frames in rare End Ships, guarded by fearsome Shulkers.
When equipped with Elytra, a player can press ![]() /
/![]() while falling to start gliding. Note that you need to be quite high to really get the full effect!
while falling to start gliding. Note that you need to be quite high to really get the full effect!
While gliding, you can steer by looking around. If you look downwards, you'll move faster – but you'll also hit the ground sooner. If you look upwards, you'll gain some height – but do it for too long and you'll stall, falling instead of rising!
As you fly, your Elytra will lose durability. You can repair them by combining them with a Phantom Membrane at an Anvil. If they break mid-flight you'll fall, so be careful.
Oceans
There are lots of different kinds of Ocean in Minecraft; they can be warm, cold, deep, or even frozen!
Each Ocean type has different plant and animal life.
Warm Oceans are filled with beautiful Coral reefs, teeming with tropical fish; be careful with Coral though, as it needs water to survive.
Many Oceans will contain Shipwrecks and Underwater Ruins, filled with chests full of powerful loot free for the taking – if you can breathe underwater. You may even find a map to buried treasure!
Only the deepest Oceans may contain Ocean Monuments, large underwater temples protected by powerful Guardians!
Ocean Mobs
Fish
There are a few types of fish in Minecraft, each with their own distinct flavor. Salmon swim up rivers, Cod travel together in shoals, Tropical fish have a huge variety of color and species, and Pufferfish will poison anyone that gets too close!
Fish can even be scooped up in Buckets for safe transportation.
Squid
Squid casually float about, minding their own business – until attacked, when they squirt out a cloud of ink to escape!
Dolphins
Dolphins are clever and sociable animals that will swim with you if they're nearby. They may even help you go faster!
Feeding raw Cod to a Dolphin might even make it want to help you in other ways… they know where everything is on the Ocean floor.
Sea Turtles
Sea Turtles travel the Oceans, swimming very far but always returning home to lay their eggs.
Sea Turtles can be bred by feeding them Sea Grass, which can be found on the Ocean floor.
Drowned
When a Zombie spends enough time underwater, it becomes one of the Drowned; a terrifying monster that can swim after its target, or hurl Tridents if it has found any.
Drowned can drop Nautilus Shells, which can be crafted together with a Heart of the Sea into a Conduit.
Guardians
Guardians are very powerful defenders of Ocean Monuments that attack with their laser eye beams!
Don't mess with them unless you're sure you're ready!
Conduit
Conduits can be crafted with eight Nautilus Shells and one Heart of the Sea.
An active Conduit will give nearby players the Conduit Power Status Effect, which lets them breathe underwater, see in the dark, and mine blocks faster.
Players will only get Conduit Power if they are underwater, or standing in the rain.
To activate a Conduit, place it underwater with every surrounding block also filled with water.
It will also need a frame made of Prismarine Blocks, Dark Prismarine Blocks, Prismarine Bricks, or Sea Lanterns. It's fine to use a mix.
The frame should be constructed in tight rings around the nine central water blocks, with the Conduit right in the middle. The more blocks used in the frame, the larger the area the Conduit can affect.
Once the frame has the maximum number of blocks (three full rings), the conduit will also attack nearby enemies!
Scaffolding (PlayStation 4 only)
Scaffolding can help you create huge structures safely! You can walk inside Scaffolding and stand on it.
If you have a column of Scaffolding you can climb it by standing in the middle and holding the ![]() button.
button.
If you want to climb down again, hold the ![]() button.
button.
Scaffolding needs support. You can only place 4 Scaffolding blocks horizontally without them touching a different block.
When you attempt to place the 5th Scaffolding block without proper support, it will fall. Scaffolding can be built up into huge towers very quickly without moving – placing a Scaffolding block on top of another will place it at the very top of the pile, rather than just on top of that block.
When Scaffolding is broken it will also break every Scaffolding block that was being supported by it.
This will let you quickly clean up your Scaffolding by breaking the supporting blocks!
Raids (PlayStation 4 only)
While exploring the world you may encounter a Pillager encampment or patrol. Pillagers are always looking for villages to raid.
Pillager Captains carry banners. Killing one will give you the Bad Omen status effect. Entering a village with the Bad Omen status effect will trigger a Raid, and waves of enemies will start attacking the village!
Defeating all of the raiders will end the Raid, and you will gain the Hero of the Village status effect.
Villagers tend to be very grateful to their heros, so be sure to check back with them. You might get a good deal on some trades.
Banning Levels (Xbox only)
If you find offensive content within a level you are playing, you can choose to add the level to your Banned Levels list. If you would like to do this, bring up the Pause menu, then press ![]() to select the Ban Level tooltip. When you attempt to join this level in the future, you will be notified that the level is in your Banned Levels list, and given the option to remove it from the list and continue into the level, or back out.
to select the Ban Level tooltip. When you attempt to join this level in the future, you will be notified that the level is in your Banned Levels list, and given the option to remove it from the list and continue into the level, or back out.
Host and Player Options
Game Options
When loading or creating a world, you can press the "More Options" button to enter a menu that allows more control over your game.
- Player vs Player
- When enabled, players can inflict damage on other players. This option only affects Survival and Adventure modes.
- Trust Players
- When disabled, players joining the game are restricted in what they can do. They are not able to mine or use items, place blocks, use doors and switches, use containers, attack players, or attack animals. You can change these options for a specific player using the in-game menu.
- Fire Spreads
- When enabled, fire may spread to nearby flammable blocks. This option can also be changed from within the game.
- TNT Explodes
- When enabled, TNT will explode when detonated. This option can also be changed from within the game.
- Host Privileges
- When enabled, the host can toggle their ability to fly, disable exhaustion, and make themselves invisible from the in-game menu. This option disables achievements/trophies and leaderboard updates for this world while playing, and if loading it again after saving with this option on.
- Daylight Cycle
- When disabled, the time of day will not change.
- Weather Cycle
- When disabled, the weather will not change.
- Keep Inventory
- When enabled, players will keep their inventory when they die.
- Mob Spawning
- When disabled, mobs will not spawn naturally.
- Mob Griefing
- When disabled, monsters and animals will be unable to change blocks (for example: Creeper explosions won't destroy blocks, and Sheep won't remove Grass) or pick up items.
- Mob Loot
- When disabled, monsters and animals will not drop loot (for example, Creepers won't drop gunpowder).
- Tile Drops
- When disabled, blocks will not drop items when destroyed (for example, Stone blocks won't drop Cobblestone).
- Natural Regeneration
- When disabled, players will not regenerate health naturally.
World Generation Options
When creating a new world there are some additional options.
- Generate Structures
- When enabled, structures such as Villages and Strongholds will generate in the world.
- Superflat World
- When enabled, a completely flat world will be generated in the Overworld and in the Nether. This option disables achievements/trophies and leaderboard updates for this world while playing, and if loading it again after saving with this option on.
- Bonus Chest
- When enabled, a chest containing some useful items will be created near the player spawn point.
- Reset Nether
- When enabled, a new Nether will be generated. This is useful if you have an older save where Nether Fortresses were not present.
- Reset End
- When enabled, a new End will be generated. This is useful if you have an older save where End Cities were not present.
In-Game Options
While in the game a number of options can be accessed by pressing ![]() /
/![]() /
/![]() /
/![]() to bring up the in-game menu.
to bring up the in-game menu.
- Host Options
- The host player, and any players set as moderators, can access the "Host Options" menu. In this menu they can enable and disable fire spreading and TNT exploding, and change the time of day, game mode, difficulty, and other options.
Player Options
To modify the privileges for a player, select their name and press ![]() /
/![]() to bring up the player privileges menu where you can use the following options.
to bring up the player privileges menu where you can use the following options.
- Can Build And Mine
- This option is only available when "Trust Players" is turned off. When this option is enabled, the player is able to interact with the world as normal. When disabled the player will not be able to place or destroy blocks, or interact with many items and blocks.
- Can Use Doors and Switches
- This option is only available when "Trust Players" is turned off. When this option is disabled the player will not be able to use doors and switches.
- Can Open Containers
- This option is only available when "Trust Players" is turned off. When this option is disabled the player will not be able to open containers, such as chests.
- Can Attack Players
- This option is only available when "Trust Players" is turned off. When this option is disabled the player will not be able to cause damage to other players.
- Can Attack Animals
- This option is only available when "Trust Players" is turned off. When this option is disabled the player will not be able to cause damage to animals.
- Moderator
- When this option is enabled, the player is able to kick players, and enable and disable fire spreading and TNT exploding. If "Trust Players" is turned off, the player will also be able to change privileges for other players (except the host).
- Can Teleport
- This allows the player to move players or themselves to other players in the world.
- Game Mode
- This allows the player to be in a different game mode from other players in the game.
- Set Player Spawn Point
- This changes where the player will respawn after they die.
- Kick Player
- For players that are not on the same [console][a] as the host player, selecting this option will kick the player from the game and any others on their [console]. The player will not be able to rejoin the game until it is restarted.
Host Player Options
If "Host Privileges" is enabled, the host player can modify some privileges for themselves. To modify the privileges for a player, select their name and press ![]() /
/![]() to bring up the player privileges menu where you can use the following options.
to bring up the player privileges menu where you can use the following options.
- Can Fly
- When this option is enabled, the player is able to fly. This option is only relevant to Survival mode, as flying is enabled for all players in Creative mode.
- Disable Exhaustion
- This option only affects Survival mode. When enabled, physical activities (walking/sprinting/jumping etc.) do not consume
.png) . However, if the player becomes injured, the bar will slowly deplete while the player is healing.
. However, if the player becomes injured, the bar will slowly deplete while the player is healing.
- Invisible
- When this option is enabled the player cannot be seen by other players, and is invulnerable.
History
| Legacy Console Edition | |||||||
|---|---|---|---|---|---|---|---|
| Xbox 360 | Xbox One | PS3 | PS4 | PS Vita | Wii U | Switch | |
| 1.66.0033.0 | Added the How to Play guide. | ||||||
| It currently contains eight pages: Basics, HUD, Inventory, Chests, Crafting, Furnace, Dispenser and Nether Portal. | |||||||
| TU2 | The index is now scrollable, instead of fixed like in the previous versions. | ||||||
| Added the What's New page, which contains patch notes from the latest title update. | |||||||
| Added the Multiplayer page. | |||||||
| Added the Share Screenshots page, which contains instructions on how to take screenshots in the game and share them to Facebook. | |||||||
| TU3 | Added the Banning Levels page. | ||||||
| TU5 | Added the Creative Mode page. | ||||||
| The Basics and HUD pages have been updated to reflect the addition of the hunger system, which is referred to as "Food Bar" in the guide. | |||||||
| TU6 | Added the Host and Player Options page. | ||||||
| TU7 | Added the Brewing, Enchantment and Breeding pages. | ||||||
| The HUD page has been updated to reflect the addition of the experience bar. | |||||||
| TU9 | Added the Farming Animals and The End pages. | ||||||
| Renamed the "Breeding" page to "Breeding Animals". | |||||||
| TU14 | Added the Ender Chest, Anvil and Trading pages. | ||||||
| The Inventory page has been updated to mention the ability to dye leather armor in the inventory, which was added in this version. | |||||||
| The Enchanting page has been updated to mention the ability to use enchanted books in the anvil, which was added in this version. However, the text that was added contains an error, which causes it to display as: "{*B} Enchanted Books are used at the Anvil to apply enchantments to items." | |||||||
| TU16 | The aforementioned error in the Enchanting page has been fixed. | ||||||
| TU19 | Added the Horses, Beacons, Fireworks, Hoppers and Droppers pages. | ||||||
Notes
- ↑ a b
Appears as:[more information needed]
- "Xbox 360 console" in the Xbox 360 Edition
- "Xbox One console" in the Xbox One Edition
- "PlayStation®3 system" in the PlayStation 3 Edition
- "PlayStation®4 system" in the PlayStation 4 Edition
| Editions | |||
|---|---|---|---|
| Version history | |||
| Technical | |||
| Exclusive features |
| ||
| Removed features | |||