Ruins of Remembrance
| ||||
| ||||
| Map description: | These ruins slumber on a forgotten island, their origins a mystery. | |||
|---|---|---|---|---|
| Location: | Aurus Island | |||
| Region: | Lental | |||
| Generations: | VIII | |||
 Location of Ruins of Remembrance in Lental. | ||||
| Pokémon world locations | ||||
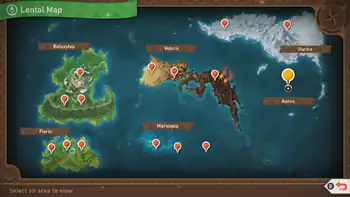
The Ruins of Remembrance (Japanese: シューゴ遺跡 Shūgo Ruins) are a location on Aurus Island of the Lental region.
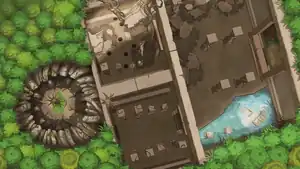
Layout
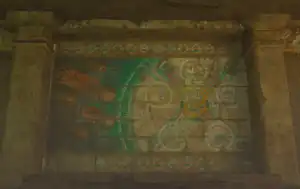
The NEO-ONE starts outside the ruins, where several Eldegoss and Houndoom can be found. The NEO-ONE will then descend into the ruins into a small room where a Noivern will fly into. This room is then followed by a large chamber with a large tree standing in the center, with only its trunk visible due to its immense height. Five statues are dotted throughout the chamber, representing the five Illumina Pokémon, along with nearby crystabloom. Several Golurk and Beheeyem are present in this chamber. As the player circles the chamber, a circle of all six crystabloom will also be present at the end of the route.
Alternate routes
- If all crystabloom are lit up inside the large chamber, the corresponding statue will light up as well. Some crystablooms will only be revealed after certain Pokémon are moved away (three Eldegoss near the fourth statue, Golurk and Natu with the fifth crystabloom). Near the end of the course, a circle of six crystabloom will be present Illuminating the Aurus island Crystabloom in the center will cause the altar to emit a beam of light. This will cause the Golurk and Beheeyem guarding the altar to move away, allowing the player to access the altar. This unlocks the Illumina Spot.
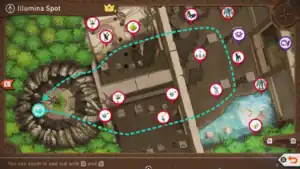
Illumina Spot
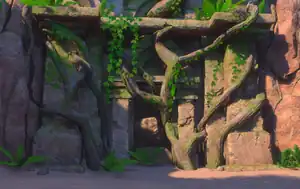
The Illumina Spot starts off in a small cave with a tree in its center. It will then enter a ruin with three rooms and circle back to the original cave. A ball of light will roam around in these rooms. If the ball is illuminated with an Illumina orb, Xerneas will appear briefly. Ancient ruins depicting a painted mural where Xerneas and the other Illumina Pokémon protecting Lental can be observed in the Illumina Spot.
Objects of interest
| Ruins | ||
|---|---|---|

|
| |
| Aurus Island crystabloom | Ancient ruins | |
| Illumina Spot | |
|---|---|
|
|
|
| Aurus Island crystabloom | Ancient ruins |
Ruins
| Course Map | Complete Course Map |
|---|---|
|

|
Description
"These ruins could be the key to understanding Lental's history. Pokémon have stood guard here for a long, long time."
Course requirements
- Unlock course: Unlocked after completing Outaway Cave Illumina Spot
- Research level 2: 40,000
- Research level 3: 50,000
- Max research level: 40,000
Pokémon appearances
| No. | Pokémon | Research Level | Stars | Description |
|---|---|---|---|---|
| 001 |  Vivillon |
3 | Several Continental Vivillon appear behind the NEO-ONE if all the crystablooms inside the ruins have been lit up. | |
| 020 |  Magikarp |
3 | A well appears after the first room. Throwing multiple fluffruit into the well will cause several Woobat to appear, followed by a Magikarp. | |
| 201 |  Houndoom |
1-3 | Houndoom can be found outside the ruins, as well as in the first parts of the ruins interior. | |
| ★★★★ | Research level 3: Houndoom may occasionally stretch and yawn. | |||
| 202 |  Eldegoss |
1-3 | A group of Eldegoss appear flying outside the ruins. Another group can be found grouped around a crystabloom inside the ruins. A lone Eldegoss also appears at the end of the path on the last statue. | |
| ★★★★ | Research level 3: A Natu will appear if a fluffruit is thrown at the ancient ruins outside. Once it eats a fluffruit, it will hop away from the ruins. As it passes by an Eldegoss, the Eldegoss will let out its seeds from its head. | |||
| 203 |  Natu |
1-3 | A Natu will appear if a fluffruit is thrown at the ancient ruins outside. Another Natu can be found sleeping on a Golurk's shoulder inside the ruins. On research level 3, a group of Natu will be huddled together close to one of the statues. | |
| ★★★★ | Research level 1 (only): After the Natu is made to appear outside the ancient ruins, it will stand on a fluffruit rather than eating it. Research level 1+: Alternatively, Natu sleeping on Golurk's shoulder will yield a ★★★★ photo. | |||
| 204 |  Absol |
2-3 | An Absol appears high above on a cliff outside the ruins. Another Absol can be found roaming around the ruins interior. | |
| ★★★★ | Research level 3: An Umbreon can be brought out of its hiding place in the first room of the ruins by throwing fluffruit to the left of the path. It will then appear sleeping inside the ruins towards the second half of the route. Throwing an Illumina orb will cause it to wake up. An Absol will join the Umbreon. | |||
| 205 | 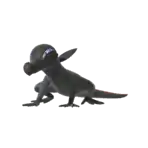 Salandit |
1-3 | Salandit can be found to the left of the path in the first room of the ruins. Several more can be brought out with fluffruit. Another group can be seen close to a crystabloom after the third statue. | |
| ★★★★ | Research level 3: A set of scratch marks can be observed near the Salandit inside the ruins. Throwing fluffruit at this area will cause a Salandit and Noivern to emerge. Salandit will attack with a Poison-type move. | |||
| 206 |  Noivern |
1-3 | Noivern appears in the first room inside the ruins. Another Noivern will emerge deeper into the ruins when fluffruit are thrown onto scratch marks found on the ground inside the ruins. | |
| ★★★★ | Research level 1-2 (only): When the first Noivern is illuminated with Illumina orbs, it will let out a Supersonic. Research level 1+: Alternatively, a set of scratch marks can be observed on the ground inside the ruins close to the third statue. Throwing fluffruit at this area will cause a Noivern to fly in from a distance. | |||
| 207 |  Woobat |
1-3 | Woobat emerge from a well just prior to entering the large inner chamber if fluffruit are thrown into the well. On research level 3, Woobat may also be found exiting the ruins into the outside if fluffruit are thrown into the ruins entrance. | |
| ★★★★ | Research level 3: A Woobat clinging onto a large central column can be found inside the ruins. Throwing a fluffruit at it and then scanning will cause it to use its sonar. | |||
| 208 | 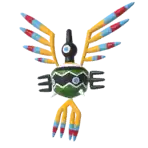 Sigilyph |
1-3 | Sigilyph can be found inside the ruins, first as the NEO-ONE descends into the large chamber, and another group towards the end of the route. One can be found sleeping behind the NEO-ONE as it descends into the final chamber. | |
| ★★★★ | Research level 3: The sleeping Sigilyph at the start of the final chamber can be awoken by throwing fluffruit at it. Throwing extra fluffruit will prompt it to start eating. It will then dance after eating the fluffruit. | |||
| 209 | 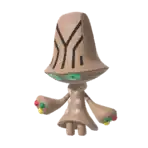 Beheeyem |
1-3 | Several Beheeyem appear inside the large chamber. One will be guarding the altar with a Golurk if the crystablooms inside the ruins have not been illuminated. | |
| ★★★★ | Research level 3: One Beheeyem will be drowsing as it floats around inside the ruins close to a Golurk. | |||
| 210 |  Golurk |
1-3 | Several Golurk can be found scattered inside the large chamber of the ruins. One will be guarding the altar with a Beheeyem if the crystablooms inside the ruins have not been illuminated. On research level 3, two GOlurk can be observed flying in the sky outside the ruins. | |
| ★★★★ | Research level 1+: The first two Beheeyem inside the ruins can be interrupted with a fluffruit. This will cause several Golurk to fly into the chamber. | |||
| 211 | 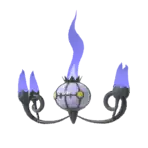 Chandelure |
2-3 | A Chandelure appears as the NEO-ONE descends into the large chamber inside the ruins. On research level 2, it will wander around the ruins. On research level 3, it will be hidden on the left hand side and must be illuminated with an Illumina orb for it to reappear later in the route. | |
| ★★★★ | Research level 2 (only): Chandelure at various points inside the ruins, if uninterrupted, will begin to absorb energy from its surroundings. This can occur if it is brought out from behind the second statue once the nearby crystabloom is activated, or at the end of the route if the incoming Absol is distracted away with fluffruit. Research level 3: The Chandelure hidden on the left hand side of the large chamber must be illuminated before it reappears at the end. Feeding it a fluffruit, illuminating it with an Illumina orb, and then playing a melody causes it to stretch out its left arm. | |||
| 212 |  Umbreon |
3 | An Umbreon can be brought out of its hiding place in the first room of the ruins by throwing fluffruit to the left of the path. It will then run away deeper into the ruins. | |
| ★★★★ | Research level 3: Once Umbreon has been brought out, it will then appear sleeping inside the ruins towards the second half of the route. Throwing an Illumina orb will cause it to wake up. An Absol will join the Umbreon. | |||
| 213 |  Jirachi |
1-3 | Jirachi can be found flying away outside the ruins. It will later be found sleeping on one of the statues inside the ruins. It can be awoken by throwing several Illumina orbs at it. It will appear only in the post-game. | |
| ★★★★ | Research level 1+: Once Jirachi is awoken, it will reappear at the end of the course if all crystablooms inside the ruins interior have been illuminated. Illuminating Jirachi at the end of the course and then playing a melody will cause Jirachi to move around and dance. |
LenTalk requests
| Request | Description | Research Level Required | Solution | Complete Description | Reward |
|---|---|---|---|---|---|
| Houndoom's Breather | Houndoom always seems to be on guard, keeping an eye on its surroundings. I wonder if it ever gets tired. | Level 2+ | One of the Houndoom outside the ruins may stretch and then yawn. | Oh, I see! I suppose it stretches like this every now and then to release tension. | None |
| Blowing Seeds | Have you ever seen Eldegoss heal other Pokémon? Just watch them closely. | Level 3 | A Natu will appear if a fluffruit is thrown at the ancient ruins outside. Once it eats a fluffruit, it will hop away from the ruins. As it passes by an Eldegoss, the Eldegoss will let out its seeds from its head. | Ah, there you go! You see, Eldegoss’s seeds are full of nutrients. | None |
| Just Perching Here | I threw a fluffruit earlier, and a Natu came down and perched on it! It was so adorable! | Level 1 (only) | After the Natu is made to appear outside the ancient ruins, it will stand on a fluffruit rather than eating it. | Yeah, that’s exactly what I saw! I got caught up in the cuteness of the moment, but next time I’ll get a photo, too! | Rita's Hairpin |
| A White Pokémon | Rita told me she saw a white, four-legged Pokémon around here. Let’s get a photo of it eating fluffruit and check with her! | Level 3 | Any of the two Absol can be fed a fluffruit when it appears. The Absol outside the ruins will only jump down to eat the fluffruit if a melody is played. | I didn’t know Absol lived here! That must be the Pokémon Rita saw, right? | None |
| Salandit's Battle Plan | This is the aftermath of a battle! It was so exciting, I forgot to take pictures, but if you ever see the rematch, you’re in for a treat! | Level 3 | A set of scratch marks can be observed near the Salandit inside the ruins. Throwing fluffruit at this area will cause a Salandit and Noivern to emerge. Salandit will attack with a Poison-type move. | So you were able to get in on the action! Noivern was cool, too, but Salandit’s counterattack was something else! | Effect 8
(Sticker) |
| Gracefully Gliding | I almost had the perfect shot, you know? It was just too quick for me... | Level 1+ | A set of scratch marks can be observed on the ground inside the ruins close to the third statue. Throwing fluffruit at this area will cause a Noivern to fly in from a distance. | Wow, this is perfect! Is there a secret to getting this kind of shot? You have to tell me! | Rita's Shoe |
| The Mysterious Heart | This shape is from... Oh, I bet you already know. See if you can get a photo of this Pokémon when it comes by! | Level 1+ | Woobat emerge from a well just prior to entering the large inner chamber if fluffruit are thrown into the well. They will then cling facing onto a wall to the right of the path. | Yep! Brilliant! This is a great photo. Good work! | Todd's Camera |
| A Break between Patrols | Sigilyph is always patrolling the ruins, but it takes breaks now and then, too. Try to keep your eyes on it! | Level 3 | A Sigilyph can be found sleeping behind the NEO-ONE as it descends into the final chamber. | Great work snapping that shot! It’s important to get shots of unusual behavior like this, too. | Todd (Smiling) |
| Drowsing Beheeyem | I could’ve sworn I saw Beheeyem sleeping while it was floating in the air. I’m not sure, though... Could you check for me? | Level 3 | One Beheeyem will be drowsing as it floats around inside the ruins close to a Golurk. | So it wasn’t my imagination! Well, Beheeyem’s out and about all the time. I guess it needs a break now and then! | Star 5
(Sticker) |
| Two Golurk | Ugh, I missed a great photo opportunity! You wanna know what I was trying to photograph? Well...this photo’s a hint! | Level 1+ | The first two Beheeyem inside the ruins can be interrupted with a fluffruit. This will cause several Golurk to fly into the chamber. | Yeeeah! This is it! Pretty cool, right? Can I look at this photo just a bit more? Please? | Character: Phil
(Sticker) |
| Groovy Chandelure | I heard Chandelure sometimes breaks out into a happy dance! I wonder what that looks like. | Level 3 | The Chandelure hidden on the left hand side of the large chamber must be illuminated before it reappears at the end. Feeding it a fluffruit, illuminating it with an Illumina orb, and then playing a melody causes it to stretch out its left arm. | Wow! Look at Chandelure go! Thanks for checking that out for me! | None |
| Fading into the Shadows | I have a hunch that a Pokémon is hiding in this area, but...maybe it’s just my imagination? | Level 3 | An Umbreon can be brought out of its hiding place in the first room of the ruins by throwing fluffruit to the left of the path. | Oh, it was an Umbreon! Thanks for looking into that! | None |
| Myth of the Ruins | Have a look at this crystal here. If I ever get a chance to meet the Pokémon sleeping inside, I’d love to see it grant a wish. | Level 1+ | Jirachi can be found sleeping on one of the statues inside the ruins. It can be awoken by throwing several Illumina orbs at it. Once Jirachi is awoken, it will reappear at the end of the course if all crystablooms inside the ruins interior have been illuminated. Illuminating Jirachi at the end of the course and then playing a melody will cause Jirachi to move around and dance. It will then place its hands together in a praying pose. | This is an amazing photo! That’s the pose Jirachi makes when it’s granting a wish. | None |
Aurus Island Illumina Spot
| Course Map | Complete Course Map |
|---|---|
|
|
Description
"Xerneas, the Illumina Pokémon of Aurus Island, can be found here, just past the collapsed entrance of the Ruins of Remembrance."
Course requirements
- Unlock course: Unlocked after reaching research level 2 of Ruins of Remembrance
- Research level 2: 1
- Max research level: 80,000
Pokémon appearances
| No. | Pokémon | Research Level | Stars | Description |
|---|---|---|---|---|
| 201 | Houndoom |
2 | Two Houndoom can be found sleeping in the large second room near the crystabloom. | |
| ★★★★ | Research level 2: If the ball of light is illuminated in the second room, Xerneas will appear and walk towards the ancient ruins in front of the large mural. The two Houndoom can be awoken by throwing fluffruit at them. They will then walk towards the center, and if the scan function is used, they will register Xerneas. They will howl in response. | |||
| 202 | Eldegoss |
2 | Eldegoss appear floating down a crack in the ceiling of the second room. | |
| 203 | Natu |
2 | Several Natu can be seen sleeping in the third room. If the Xerneas event has been activated in the second room, one can be found sleeping nestled up to Xerneas and Umbreon. | |
| ★★★★ | Research level 2: A photo of any Natu sleeping grants a ★★★★ photo. | |||
| 204 | Absol |
2 | An Absol appears in the second room if the Xerneas event here is triggered. | |
| 206 | Noivern |
2 | Two Noivern can be found flying in the second half of the second room. One will fly into the third room. | |
| 207 | Woobat |
2 | A group of Woobat appears flying in the opposite direction to the NEO-ONE at the start of the route. Several more can be seen further in the first room. | |
| 208 | Sigilyph |
2 | A Sigilph appears flying into the first room at the start of the route. A second can be found up at the cracked ceiling in the third room. | |
| 210 | Golurk |
2 | Two Golurk appear flying into the ruins in opposite directions if the first Sigilyph has been interrupted with a fluffruit twice (first in the first room, and a second time when this Sigilyph has moved into the second room). | |
| ★★★★ | Research level 2: A photo of a flying Golurk grants a ★★★★ photo. | |||
| 211 | Chandelure |
2 | A Chandelure can be found in the second room. | |
| 212 | Umbreon |
2 | An Umbreon can be found sleeping in the third room. If the Xerneas event has been activated in the second room, it can be found sleeping nestled up to Xerneas and Natu. | |
| 214 | 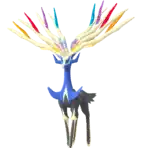 Xerneas |
1-2 | A ball of light travels throughout the route. If an Illumina orb is thrown at it, Xerneas will appear and may perform an action. The first time the player takes a photo of Xerneas in the Illumina state, Xerneas will appear at the end of the course before turning back into its tree form. | |
| ★★★★ | Research level 2: If the ball of light is illuminated in the second room, Xerneas will appear and walk towards the ancient ruins in front of the large mural. The two nearby Houndoom can be awoken by throwing fluffruit at them. They will then walk towards the center, and if the scan function is used, they will register Xerneas. Xerneas will then perform the move Geomancy. |
LenTalk requests
| Request | Description | Research Level Required | Solution | Complete Description | Reward |
|---|---|---|---|---|---|
| The Power of Xerneas | The Illumina energy in this area seems particularly strong. We may be able to observe Xerneas behaving in new ways here. | Level 2 | If the ball of light is illuminated in the second room, Xerneas will appear and walk towards the ancient ruins in front of the large mural. The two nearby Houndoom can be awoken by throwing fluffruit at them. They will then walk towards the center, and if the scan function is used, they will register Xerneas. Xerneas will then perform the move Geomancy. | Thank you for investigating! I can tell from this photo there must have been a tremendous amount of energy there! | Professor Mirror (Surprised) |
In other languages
| ||||||||||||||||||||||||||
Ruins
| |||||||||||||||||||||||||||||
Aurus Island Illumina Spot
| |||||||||||||||||||||||||||||
Related articles
| This article is part of both Project Locations and Project Sidegames, Bulbapedia projects that, together, aim to write comprehensive articles on locations in sidegames |