The Practical Sketcher

THE
Practical Sketcher
A complete and practical method of sketching
FOR
Women's, Misses', Junior's, Children's and Infant's Garments.
Specially designed for self-instruction
BY
Prof. I. Rosenfeld
PUBLISHED BY
The Leading Pattern Co.
NEW YORK, U. S. A.
1915
COPYRIGHT BY
ISIDOR ROSENFELD
ENTERED IN THE LIBRARY OF CONGRESS
WASHINGTON, D. C.
1915

INTRODUCTION
Recognizing the needs of a practical method for garment sketching, I have set my mind to build a solid base of well-controlled and systematic outlines for practical sketching by which the method is not only to bring the necessary outlines but also to simplify the system of body sketching for all kinds of women's, misses', juniors', children's, and infants' garments.
The systematic outlines of sketching given in these pages are based on positive constructions whereby each diagram fulfills the requirements of a certain body foundation for sketching by which a practical method of sketching can be mechanically controlled.
The Author

When beginning to sketch it is necessary for us to remember that when sketching the garment there is no such thing as a set of measures which build the sizes of sketching, all there is necessary is, that we need to employ a certain amount of space by which the entire sketch is carried out. A sketch is therefore built by bases of inches, 1 inch, ½ inch, or ¼ inch.
You will note that the instruction in the following pages, the entire method is given and described by inch spaces. These spaces are the divisions equally divided according to the height of the body which will, no doubt, prove that in order to make the proportional sketch it is necessary for the sketcher to remember to have some knowledge of obtaining proportions according to height measure for which a diagram and description is given in the continuing pages by which this method will be fully described.
It is also necessary to remember that each and every different kind of garment meaning, waists, skirts, and dresses, occupy a part of the entire height division for instance, the waist foundation occupys 2 units of this height division. The skirt occupys 5 units of height division and when the entire amount is added, which means 2 for waist and 5 for skirt, which fully amounts to 7 units which shows that we are to employ these 7 units for the full body which combines the waist and the skirt and makes a dress foundation.
The jacket, coat, and cape foundations are to be built on a complete foundation whereby we recognize the lengths and full effects of the body and the lengths therefore for these garments are distinctly showing the various spaces of the entire body.
For the different sizes of juniors', children's and infants' garments the system of body sketching can also be distinct so as to be able to tell the different growths in inches which enables us to obtain the correct body sketch for every garment.
It shall be understood that the outlines for sketching for each and every model for women' misses', juniors', children's, and infants, size shall be built according to its proportional height so that we are able to obtain the correct division of each model size and it will be necessary for us to remember that we have to post ourselves to the height of each model size. The height shall therefore be remembered for each and every model size which are as follows:
| Women's | size | 36 | proportional | height | is | 5 ft. | 6 in. |
| Misses' | size | 16 | " | " | " | 5 ft. | 4 in. |
| Juniors' | size | 15 | " | " | " | 5 ft. | 1 in. |
| Childs' | size | 10 | " | " | " | 4 ft. | 8 in. |
| Infants' | size | 4 | " | " | " | 3 ft. | 8 in. |
In beginning to prepare foundations for body sketching it is necessary that we obtain the foundation for the total height by which we can fully describe the spaces for each part of the body and in order to obtain the same note the diagram herewith showing that the entire height whereby we may learn that the first unit covers the head space from the neck to the natural waist length occupys 2 units and the space between the waist length to the ground occupys 5 units for the skirt length.
It is therefore necessary to memorize that we are to occupy 7 units of the body as the head space is not necessary when sketching the garment.
Remember that the amount of space which makes up the entire form you will note each space measures 1 inch in height which makes this outline a 1 inch space sketch outline and this is why we call the size of this sketch a 1 inch space.
This drawing can be planted on a ½ inch also and no doubt the sketch will be one half of this size but as a rule the 1 inch space sketching is the most suitable one and therefore employ the 1 inch space for all further instruction.


In order to begin the sketching foundation line, make up your mind the space which is the size of sketching as mentioned in the front pages of this work. Now for instance, we begin the foundation of the blouse or waist sketch with a 1 inch space which is the most practical one.
As we are now to begin a foundation for a waist or a blouse make 4 equal inch spaces as shown on the diagram, from 1, 2, 3, 4, 5 and 6. The space between 1 to 4, 2 to 5 and 3 to 6 is 2 inches each and now divide the space from 1 to 4 and 3 to 6 and draw a line from 7 to 8 and 9. which you will, no doubt, notice is a box of 4 equal inches. Follow diagram on top.

To continue, use the foundation of Lesson No. 1, and continue with dividing the opposite space between 1 and 2, which makes 3, and then divide the space between 1 and 3, which make 4, and cross lines from 4 to 5 and 3 to 6. These lines will be used for the shoulder and neck space.
Now divide the space between 1 and 7, which makes 8 and draw a straight line down to 11. Now again divide the space from 7 to 8, which makes 9, and draw a line from 9 to 10.
Note that the two lines at 7 and 9 are raised up a ¼ of an inch. These are for preparing for the neck part Note that this particular lesson described on the diagram is preparing a front view, whereby the bust will appear to the right-hand side and therefore watch carefully the diagram. Follow diagram on top.

To continue, we are now to prepare the neck and shoulder space and therefore we first begin the neck part. Take the equal space between 8 and 1 and 7 and 3 and make the curve of the neck from 7 to 8 as shown on the diagram. Then extend bias lines from 7 and 8 up towards 9 and 10. The line should be a trifle bias to the inner part of the neck and then make a curve at the top which is from 9 to 10 and a lower curve for the top part of neck at 12 to follow the effect of the bottom curve from 7 to 11 to 8.
Now make connections for the shoulder from 8 to 2 and 7 to 4 and curve them as shown. Continue from 4 to 6 for the bust curve, from 5 to 6 is about ⅛ of an inch which is a one quarter part of a one half space or of a ½ inch.
The other shoulder to the left side which is at 2 and 0, you will note, give a sleeve or an armhole curve and the space between 2 and is about ⅛ of an inch and the space between 2 and the outside curve is a double amount and this curve has to be partly studied to show the proper or natural detail of the sketch.

This lesson will finish the entire front sketch for the blouse or waist and therefore continue to curve from 6 to 7, down to 8. 7 is about ½ space between the line at 6 to the bottom line, which is 8. 8 is about ¼ space of an inch, or ½ space between the line 0 and the center line.
You will note that 9 is ½ space of the other side and between 9 and 10 is about ⅛ of an inch allowance, which makes then the proper belt effect from 10 to 8 and curve them to the parallel space about ¼ of an inch for belt effect, as shown on the diagram, from 8 to 12, and 10 to 11.
Now continue making the sleeve curve, from 3 down to 4, and from 2 curve out a trifle roundness down to 5, and make a hollow circular curve, from 4 to 5, which finishes the bottom length of sleeve and the length for same is guided by the full waist length. The part sleeve which is shown at the right-hand side is only continued from 7 to 0, to show that the sleeve is hidden by the bust and this completes the lesson of sketching the blouse or shirt waist.

Left Hand Side Bust Effect.
Note that this sketch is the same as Lesson No. 4, with the only difference, that this outline is showing the reverse way of sketching the bust effect and that the bust for this sketch is showing towards the left and not to the right. The sleeve and shoulder is showing towards the right hand side. It is therefore not necessary to repeat this lesson. All you may do is to study carefully the first ones and reverse this accordingly.

To begin the back view, it is again necessary to produce the diagram of the first lesson. When such is complete divide from 1 to 2, which makes 3 and from 3 to 1 which makes 4, and draw lines. Then divide between 3 and the middle line which makes 7, and from 7 to the middle line, which makes 8 Again divide from the middle line to 5, which makes 6 and from the middle line and 6, which makes 9, and make all these lines.
Note that lines 8 and 9 are drawn up ¼ of an inch to 10 and 11. preparing for the next space.

To advance for the back view sketch divide equally the space between the upper top line and and lower line which appears at 1 and 2 and draw slant lines in for the neck from 2 to 8 and from 1 to 7, as shown on the diagram. Then connect shoulder lines from 1 to 4 and 2 to 3. 3 and 4 are ⅛ of an inch in from the straight line. Then divide on the bottom line between the edge line and center line on both sides, half space, which makes 9 and 10 and the space between 9 and 10 is the original width of back at the waist line, which makes the proper space for belt at the waist line. This makes it ready for continuation on the next lesson.

In order to complete the back view, it is now necessary to continue the curving of the shoulders for the sleeves, from 1 down to 7 and 2 down to 8. The space of curve line is 7 and 8, which is about ¼ inch extended from the original outline of the box which always means ⅛ of the box space which we use for sketching.
The sleeve length of this sketch is situated according to the full length of the waist, which reads to 7 and 10 and 8 and 9. The space between 7 to 10 and 8 to 9 is about ½ inch or ½ of this box space and connect to 18 and 19 for the underarm space which is about ½ space between the waist line and breast line and then it is necessary to make a round curve from 1 to 3 and 2 to 4. Be careful and study these curves as they are the most important part for sketching. The belt effect between 3 and 5 and 4 and 6, you will notice is about ¼ of an inch for 1 inch space of sketching.

Left Hand Side
To draw a sketch of back view left hand side with trifle side view, it is necessary to draw the same foundation lines and all we immediately have to see what changes are to be made. Therefore note when giving a back view, left hand side, it is meant that the left shoulder from 13 to 1 is built the full width and the right hand side of the shoulder from 14 to 2 is narrower than the original The space between 2 and 11 is ¼ of an inch in from the outline at 11 instead of ⅛ of an inch and the other shoulder at 1 there is none taken off but the full width of space is used for the full width of shoulder but otherwise there is no difference in the entire body effect with the exception of the main sleeve for which the curve is about equally divided on the outline from 1 to 7 and 8, not as the sleeve on the left hand back sketching.

Right Hand Side
In order to make a sketch of the back view, right hand side, note the difference between the left hand and flat back sketch. The difference in this, in the right hand view, is this is built just the opposite way. The full width of shoulder at the right hand at 1 takes the entire space just as the shoulder in Lesson No. 9, from 13 to 1. The other side from 11 to 2 is ¼ deducted instead of of ⅛ an inch.
All curves, otherwise, are made the same as all other backs. The sleeves of this form are just the same as the left hand side view, which is both ways about equal space for the curve of the sleeve from 1 to 9 and 10. The left hand side sleeve for this sketch is drawn a trifle curvy down to 7 and 8 reaching about the full length of waist in a hidden form to extend ½ inch from 5 to 7.
STYLE BLOUSE SKETCHING
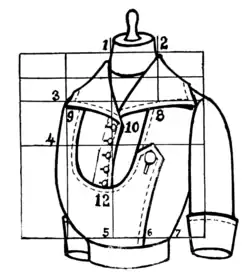
This lesson is giving the full details of how to sketch a certain style of blouse when the foundation of sketch is already prepared. Note that the diagram on the opposite page is fully prepared with foundation lines. Before beginning the same look well at the diagram and see the position of the foundation sketch used for this diagram. You will note this one is the left hand sketch, which means the bust is built towards the right. The foundation for this, you will find in lesson 5, in the front pages and in order to begin the style, it will be necessary to prepare the foundation and use same as prepared, then continue with the following outlines to make the stylish sketch. To begin, note, the first thing we do is to begin the collar curves for the direct breaking for the neck at 1 and 2 and then continue with the curving towards the shoulder from 1 to 3 and 2 to 0.
Note that the collar at the arm side is showing narrower considering the amount of the width of shoulder given at that place and that is because the shoulder at this place gives the full width, as it is the main shoulder line, otherwise, the collar at both sides is the same width and continue making curves for collar. The beginning of the opening which is placed at 10 which is half way between the space of 3 and 4 and a trifle in from the center line towards 10. This is done because there is a button stand allowed and as the lapping is done towards the arm side. Note the front buttons down bias towards 12, which is placed between the breast line and waist line
The curving of the yoke from 8 to 12 up to (illegible text) is followed according to the slantness of the front buttoning. The lap-over is the style which is placed towards the arm side, which is taken equal space between 7 and 5 on the waist line, which makes 6 and raised up to the breast line. For further details watch closely the diagram and follow closely this particular style.
LESSON NO. 11
STYLE BLOUSE SKETCHING BACK VIEW

The back part of this style is simple. The collar curve, which you will note on the diagram, is raised on the line, from 1 to 3. The curving at the shoulder part is rounded up to meet the effect of the front collar curving to harmonize with the same proportionately. The yoke effect, which is shown on the back, is shown a trifle higher to 2 and 4 with a slight curve effect, which is as a rule, to be used when this style of yoke is formed at the back. The original back view of this diagram where the foundation can be first learned, which is the proper thing to do before making use of a style forming the back is to be found on page 17, lesson 8, where all details are given how to obtain the complete foundation of back view. This is merely an outline of how to build a style on the same. Note that the foundation lines for either front or back are not necessary to be drawn when a style is needed, only the original curve lines can be made. It is understood that this can only be done when the student has full acquaintance with the foundation lines, whereby the necessary curves can already be made freehand, which, no doubt, comes after practice according to the foundation lines.
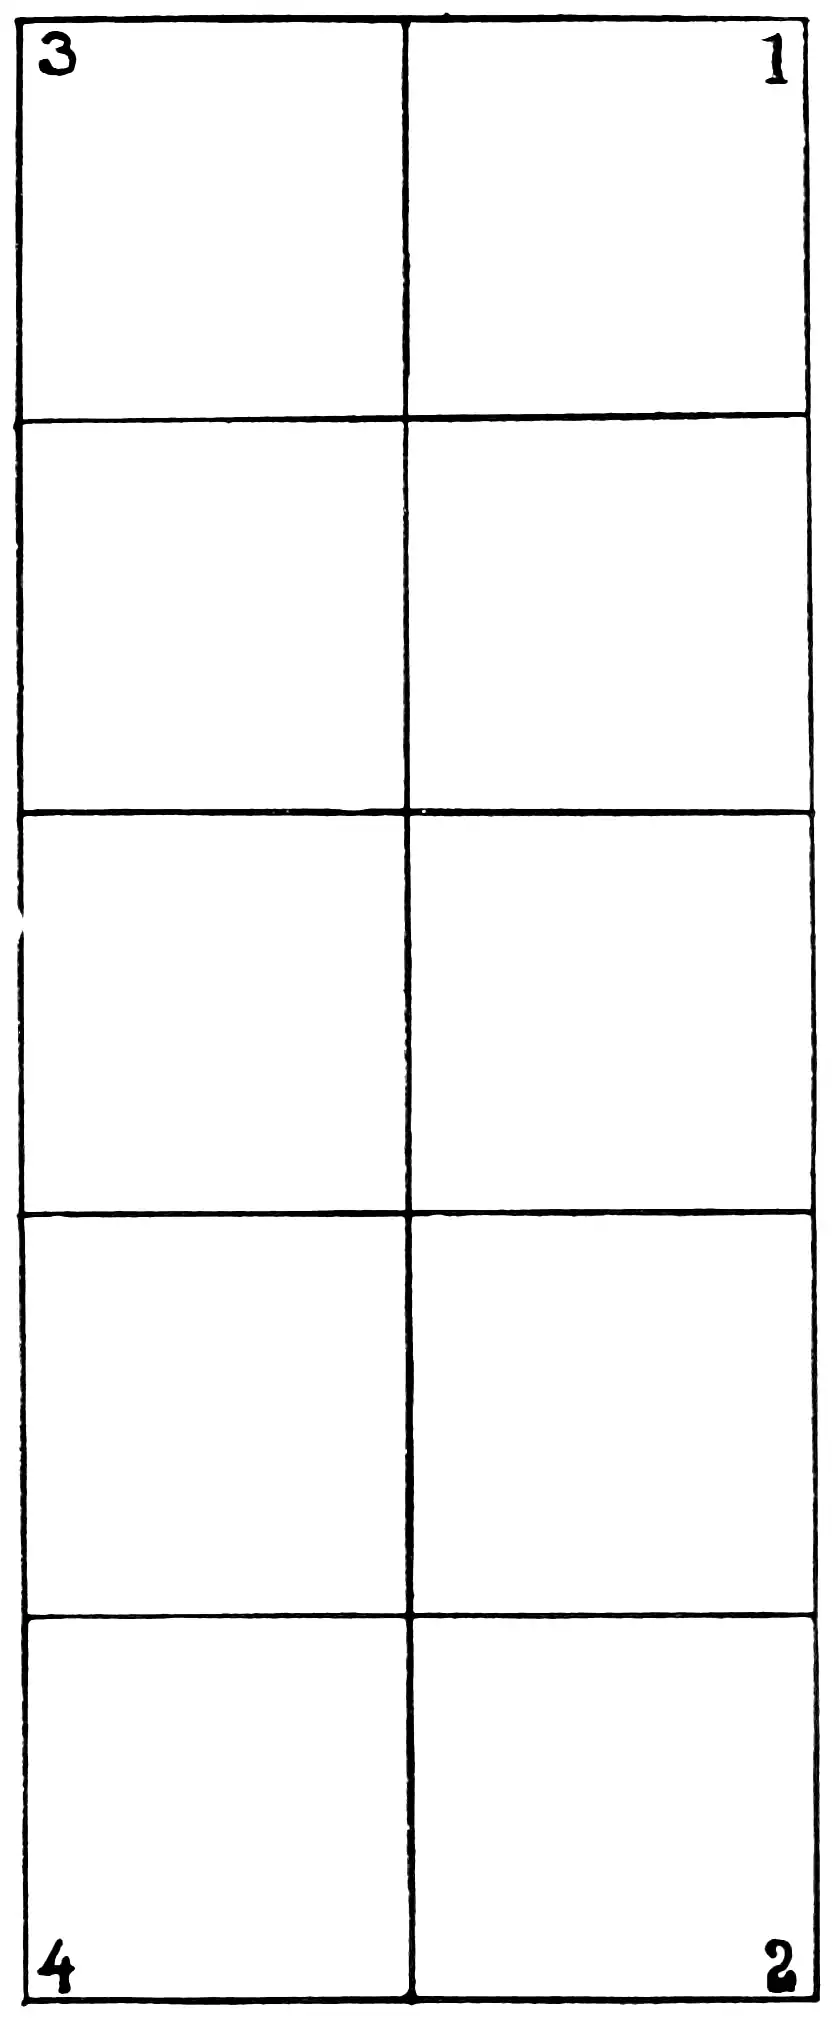
In order to begin sketching the foundation for a skirt, remember that the skirt is to occupy 5 sections of the total height which means that 5 one-inch spaces are to be used in length and draw lines as follows: from 1 to 2 make 5 inch spaces and from 1 to 3; 2 to 4 is 2 inches and cross lines as shown on diagram, which will make spaces 5 inches in length and 2 inches in width and see next lesson for continuation.
To complete the front view, begin the waist part and divide between 1 and the center line at X, which makes 5 and the center line at X to 3, which makes 6 and curve the waist effect from 5 to 6. Then connect for the hip from 5 to 9 and 6 to 8 and note the connection at the hip is a trifle in from the straight side lines. For a narrow bottom on skirt have ⅛ of an inch in at 2 and 4 and for the wide bottom skirt increase at 2 and 4, ¼ of an inch at each side.
A WORD ABOUT SKIRT SKETCHING IN ALL DIFFERENT VIEWS
In sketching skirt foundations for different views, it will be necessary to remember that skirts may be sketched in 4 different views; front view, right hand view, left hand view, and back view. Each of these is placed on one particular foundation as shown on page 23. It is therefore necessary for the student to remember the different details in changing the actions for each different view.
The front flat view, which is the very first, is begun with the waist part which is equally divided in 4 equal sections, from 1 to 5, 5 to X, X to 6, and 6 to 3 which are equal proportions at the rate of ½ inch each as the entire space from 1 to 3 is 2 inches. The hip is continued as shown on diagram The right hand side view is altogether different than the front view showing the waist action entirely towards the right hand side. The beginning of waist is at the edge line at 1. The side seam is ⅛ of an inch in from the one half of diagram from X to 11 .
The left hand side view is just the opposite direction of the right hand side view, which is the reason of operating on the same with the opposite directions, but the action and amount in space is all the same as the right hand side view. The back view is a trifle similar to the beginning part of the flat front view with the understanding that the waist is equally divided into 4 equal parts of the entire foundation, from 1 to 9, 9 to 5; 5 to 7, and 7 to 3, The space at the bottom from 4 to 8 is ¼ of an inch decrease and from 2 to 10, at the right hand side is ½ inch increase and connected towards 11 up to 9.
LESSON NO. 15
RIGHT HAND SIDE VIEW
In beginning the side view always prepare the first lesson of skirt foundation and guide yourself for the front line according to line 1 and 2.
From 2 to 3 allow ¼ of an inch and connect the same up to 1. In order to establish the right waist point deduct about of an inch at X towards 11 and curve for waist from 1 to 11 and continue for the hip from 11 towards 8 down to 4 as shown on the diagram.
The space from 7 to 8 is ¼ of an inch for increase of hip and the raise from 4 to 9 for bottom curve is also of an inch. Then curve the bottom as shown on the diagram, 9 to 6 and 2 to 3. The guide line for front may be used from 5 to 6. This completes the right hand side view.

LESSON NO. 16
LEFT HAND SIDE VIEW
The left hand side view is an actual copy of the right hand side view and it is therefore only necessary to use the opposite directions in spaces and all actions necessary.
The belt for both or probably all skirt sketches shown herewith are ¼ of an inch. The upper curve is followed always according to the lower curve as shown on the sketch, from 1 to 11. and the above curve as shown on the diagram on 12 is the opposite lower curve at 5.

LESSON NO. 17
BACK VIEW OF SKIRT
In order to begin the back view of the skirt sketch, it will be necessary to prepare the foundation lines as shown in the first lesson, from 1 to 2 crossed to 3 and 4, 5 inches in length and 2 inches in width and then divide the same lines between 1 and 3, which makes 5 and between 2 and 4, which makes 6.
The straight side of the skirt, which is towards the left hand side is divided equally between 3 and 5, which makes 7 and from 4 to 8 is ¼ of an inch and connect 7 and 8 for a straight side seam of skirt. Then 9 is ⅓ of the space of 1 and 5 and the trace line, which is preparing the back seam, is ½ space between 5 and 9.
From 2 to 10 is ½ inch and connect with a curve line up to 9 to meet 2 spaces up from the bottom at 11, as shown on the diagram. The trace line at the bottom, which prepares the back seam at the bottom is ½ of space between 6 and 10, which makes 12. The curve of the waist line at the back is rounded up a way from 7 to 9; follow the upper curve above 7 and 9 accordingly, which makes the opposite diagram of the front sketch.
LESSON NO. 18
BACK VIEW OF SKIRT WITH TRAIL EFFECT
The trail effect, back view, which you will note is as a rule used for evening wear and therefore has an increase on the bottom in length of 1 additional inch from 2 to 5, and 1 additional inch in width from 5 to 6.
The foundation is drawn the same way. The waist is equally divided in the center as the front view of skirt as shown on the diagram. X is the center of 1 and 3, and from X to 7 and 8 is equally divided. At 4 there is ⅛ a of an inch space in and connect it up to 8.
In order to draw the right hand side line take ½ from 1 and 2, which makes 9 and draw a line from 7 to 9 down to 6 as shown on the diagram, and then make a trace line which will show the back seam from X at the waist line ¼ of an inch in lost with a curve to 2 down to 6 following the effect of the line from 7 to 9 to 6, and the bottom to be curved from 4 to 5 in connection with 6, as shown on the diagram.

LESSON NO. 19
STYLISH SKIRT SKETCH
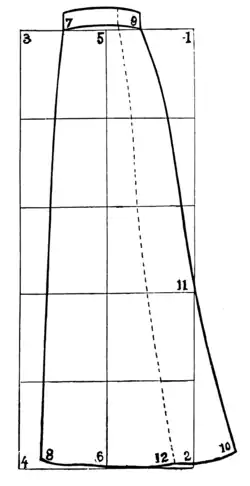
This lesson shows how to sketch a stylish skirt. You will note that this skirt is built on the ordinary foundation as begun with the exception that a trifle change is made regarding the style. Note the differences as follows:
At the waist line, which is the principle part, note that at 10, which is half of the right hand space between 1 and X, there is ⅛ of an inch allowance towards 1. The left hand side from 9, there is ¼ of an inch in towards the center and 9 is half space of X and 3.
The yoke part of this skirt, which is rested on the second line is about ¼ of the total height, which is therefore the average length of a short yoke. The bottom of the skirt is naturally increased with a straight line to show the medium fullness of the skirt which is as a rule left to judgment, and also to carry out the various styles, from time to time.
This skirt shows a short length skirt. For a full length skirt we reach the bottom line from 2 to 4, and as this sketch, we have the skirt shorter about 4 inches, which is represented by ½ inch space up at 5 and 6.
The back part of this sketch is simply continued exactly the same effect with the exception that we may make at the back no buttoning.
LESSON NO. 20
COMPLETE FOUNDATION FOR DRESS OR SUIT
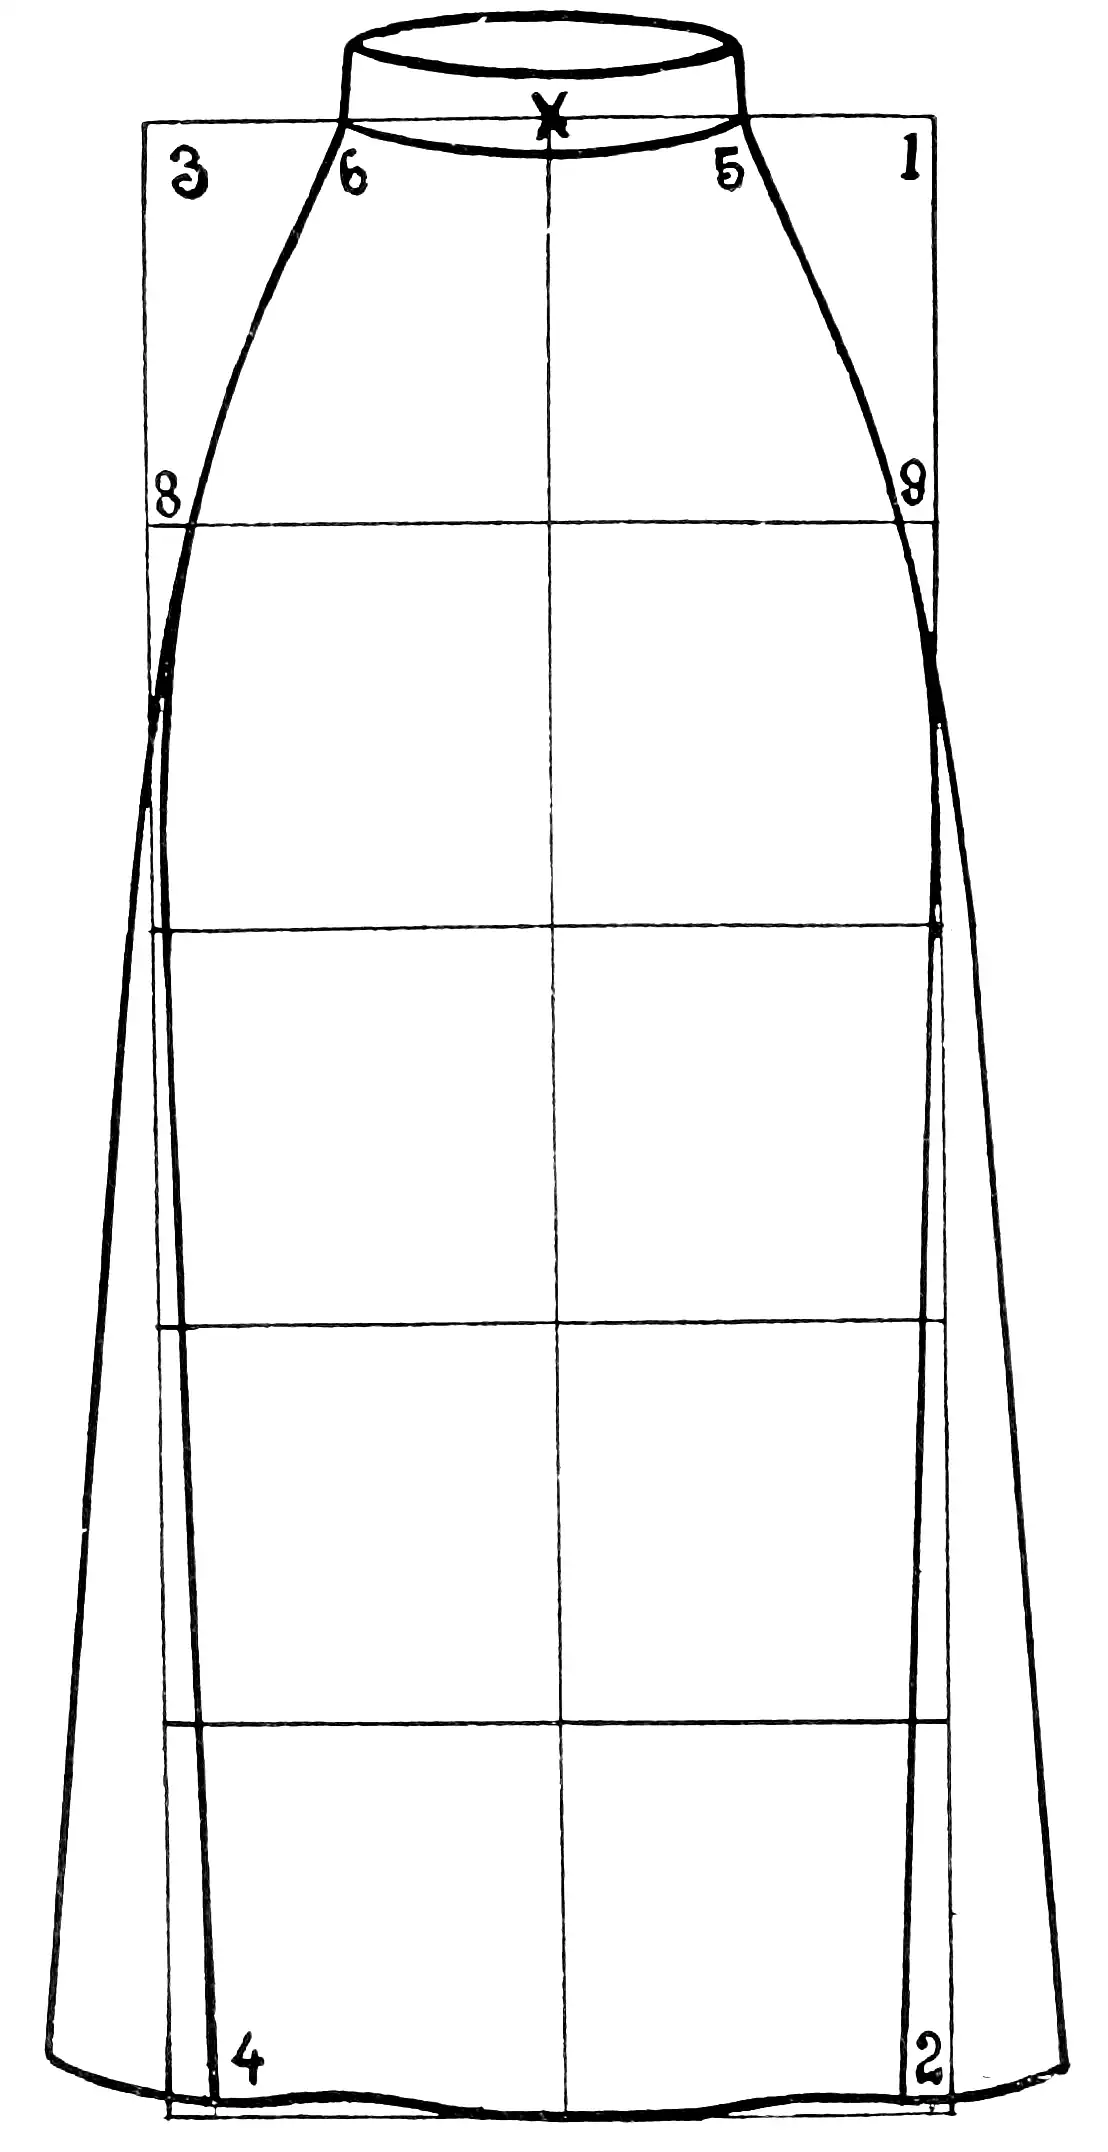
The opposite diagram is showing the complete foundation for the entire height of the body which consists of 7 equal spaces on which we combine the blouse or waist part with the combination of the skirt as shown on the diagram, divided into 7 spaces in height and 2 spaces in width. In order to continue for any one of the garments, a dress or a suit, it is first necessary to note the entire foundation of the complete body from neck to the ground, which will be continued in the following lessons, which are described by diagram and description.
You will note the continuing lessons are strictly devoted for dress Note that in order to prepare a complete outline for a suit, it will be necessary to refer to this description and diagram just as well as we are now making use of it for a dress. The reason for making use of this particular foundation is to simplify the proper style creating the most simplest way and at the same time, to shorten the length of time for the further practice and doing away with all hesitation, which may occur from time to time.
In the further lessons you will no doubt, find complete foundation prepared without lines, which is to show that this foundation must be well memorized that no systematic lines are necessary.

LESSON NO. 21
SECOND COMPLETE FOUNDATION FOR A DRESS
To continue the entire foundation for a dress we continue as follows: Divide from 1 to 3, which makes X and from 2 to 4, which makes XX and draw a straight line from X to XX. Then divide from 1 to X, which makes 8 and draw a line down to 9. This line particularly calls our attention that the main bust line will be built towards the right, which will be called right hand side view.
Now let us build the shoulder line. For the shoulder line divide the upper space in half, which makes 5 and draw a line straight across and then divide from 1 to 5, making 6; draw a line also across, as shown on the diagram. Equally divide from X to 3, which makes 7 the outline for continuation for the neck place.
In order to continue this foundation or for further advancing see the next diagram and description.

LESSON NO. 22
THIRD COMPLETE FOUNDATION
FOR A DRESS
In further progressing with the dress foundation it is now necessary for us to make preparations for curving and, as a rule, we first begin with the neck.
Therefore, draw a line up at X and 7 for about ¼ of the foundation space, which means if this foundation space is 1 inch, it must be ¼ of an inch and then curve the collar slant especially on the left hand side towards 7. Then curve the shoulder from 7 to X towards the neck down to the bust curve. The bust curve, you will note, is crossing the line, which is drawn from 8 to 9 about ½ space between breast and waist line. 10 is ½ space between 9 and the center line and continue with a straight line from 1 to 11. 11 is ½ of the box from the right hand outside to the center.
Now curve from the bottom of neck, from 7 to X and also the upper part of the neck to show the hollow of neck, as shown on the diagram. See the next diagram and description for the entire completeness of the dress foundation.

LESSON NO. 23
COMPLETE DRESS FOUNDATION
RIGHT HAND SIDE VIEW
Now to continue to complete the entire foundation by preparing the entire outline for the dress as follows: Draw the armhole and sleeve at the left hand side from 7 down to 9 with a medium curve to meet the straight effect from 7 to 8 and then draw a curve from 7 towards 10 to the outside elbow of the sleeve with a much fuller curve than the inside curve of the sleeve. See to it that the length of sleeve is rested on the hip line and to show there a hollow part or an opening of the cuff at 9 and 10.
Now make a curve from 8 to 11 which makes the left hand side seam, which is ⅜ of an inch in from 13. Then curve from 8 towards 11 down to 12 for the full continuation to 12, which meets the bottom of the dress. Note that 8 is about ⅛ of an inch up between ½ space of breast and waist line.
This sleeve foundation is showing the natural armhole in depth. Now continue in preparing the right hand side sleeve, which is hidden between bust effect the following way. 6, which is showing the full length of sleeve, is ½ space between the straight line and the edge line of the dress, right side, and continue to curve about one sixth of an inch in on the straight line at 3 so that the sleeve shows a trifle curve effect similar to the full sleeve shown on the left hand side and finish the full length of sleeve both alike.

LESSON NO. 24
COMPLETE DRESS FOUNDATION
LEFT HAND SIDE VIEW
This foundation is the same as the previous lesson called complete dress foundation right hand side view. The foundation is different only in the opposite way of built. The bust is built towards the left instead of the right, therefore, follow instructions exactly like the one before with the opposite dimensions and no other additional time is to be wasted.
The reason this outline is given is to suit the different tastes and ideas of people who may want to make their sketches towards the left instead of the right. We practically advise all sketchers to make use of mostly the right hand view, but many times it is a case of habit and we, therefore, show this particular left hand view, otherwise, there is no different point regarding mechanical details, whatsoever.
Regarding a more clear proposition of garment sketching, as we have already explained we are showing a complete foundation without systematic lines but only by traced lines, which is given in the next pages of this book.

LESSON NO. 25
COMPLETE DRESS FOUNDATION
BACK VIEW
In order to begin this lesson it will be most advisable to see the beginning of back view of the blouse, which is shown on pages 15, 16 and 17 as they show the beginning of how the same is conducted. The difference is that this time we use the entire foundation for the dress, which consists of 7 one inch spaces in length and 2 one-inch space in width and note the following:
The first or top space is divided by 5 and 6, on which the shoulders rest and from 5 to 12 and 6 to 11 is ⅛ of an inch in. The line at 7 and 8 is the neck line where the neck is raised up at 9 and 10 the same as on the blouse sketch. 13 and 14 is the ½ space of each inch space and from 11 to 13 and 12 to 14, make also the same curves and the continuation with the hip curve from 13 against 19 to 4 and from 14 towards 20 down to 3, 19 and 20 is ¼ of an inch in from the outlines, which gives a medium size hip.
No doubt, the hip wants to be larger and also the bottom of the skirt is to be larger. The sleeves for this diagram is conducted the same as the back blouse, lesson 8 shown on page 17. Otherwise, there is very little difference between this dress or blouse foundation.

LESSON NO. 26
COMPLETE DRESS FOUNDATION
RIGHT HAND BACK VIEW
This diagram is showing the back with the right hand view and the difference between this and the flat back view is as follows: Note first of all the center of this foundation which is the same as others. The center line is shown on the top line at 23 down to X at the waist line.
Then 22 is ½ of the box space between 2 and 23. The space between 22 and 23 is this time used as the neck space, which means that when the shoulder and sleeve is shown right hand view, the neck in such case, is placed in the left hand view and, therefore, at 6 we build the shoulder narrower ⅛ of an inch in from the straight line. The right hand shoulder is connected ½ space in of the shoulder line showing at 19.
This foundation is also similar to the back blouse right hand view shown on page 19, but it is differently built on account of a more fuller waist. The waist line from X to 13 is ⅓ of the box space towards the right hand and from 12 to 11 is one third of the box space, or the space between X and 11 is ⅔ of the entire space between X to 12. Continue to curve from 11 against 14 down to 15 for the fuller bottom, and from 13 to 16 continue a straight line to the bottom of 17. From 3 to 17 is one-third of the box space, which means if this box space is 1 inch, the space from 3 to 17 is snug ⅜ of an inch:

LESSON NO. 27
COMPLETE DRESS FOUNDATION
LEFT HAND BACK VIEW
This diagram is showing the lesson before with one trifle exception, that this is the left hand side view and. therefore, is to be built the same as the right hand side view with the following differences:
Instead of having the neck built on the left hand side it is built, this time, the opposite way towards the right hand space of the outline. 23 is also the center line and 22 is ½ of the box space between 2 and 23. The shoulder is also placed in the opposite direction. The waist and the continuing of fullness of the bottom is also built the reverse way.
It would be advisable for every student to make always a full study of the right hand side view first and to follow the left hand side view just the opposite way.

LESSON NO. 28
DOTTED OUTLINE FOUNDATION
FRONT AND BACK VIEW
These 2 diagrams are showing the front and back dotted outline foundation, which are an exact copy of the front and back foundation given with full description and systematic outlines in the front pages.
The reason for doing so is to show the clear views of these diagrams without any systematic outlines. The same can, no doubt, be obtained only when the student has a full knowledge of how to produce the foundation by systematic outlines only, because sketching or free hand drawing needs training just as well as everything else and to train ourselves to such mechanical controlling that this is the particular reason that all sketching outlines are shown with systematical productions in most of the work given in this book.
Now, in order to make use of these diagrams it is necessary to practice each and every diagram so long that you are able to make it a free hand outline as given herewith. Then when we have the taste for sketching any style of garment, we are ready to continue the same on the clear figure drawings. To obtain the best results watch the next lessons of how to sketch a style on a systematic foundation.
LESSON NO. 29
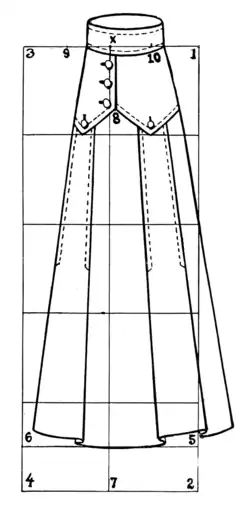
STYLISH DRESS FOUNDATION WITH SYSTEMATIC OUTLINES
In order to prepare a style on the foundation the first thing necessary is to build the collar and see how deep the opening is supposed to be. Immediately decide if there is buttoning in the front or back. The front diagram shown herewith is buttoning in the front, therefore, an allowance is made a trifle towards the side. The line at 8 is shown in the center, which is drawn down from 10 the center line of the entire foundation.
Note that this foundation is facing the right hand side, therefore, call it the right hand side view. The neck is placed to the left hand side, which simply means looking from the left to the right. Next the belt effect and see if there is any fullness in the waist making the heavy marks at the waist to point out the fullness in the blouse all around the waist. When there is a belt, place the same from the natural waist line.
At the same time mark the style of the front of skirt. If there is a buttoning in front of the blouse of the dress, make the continuation of same as shown on this skirt in front down to 11 . Remember, mark this style of cuffs the same as the collar. This collar happens to be scallopped follow the cuffs the same.
The BACK view is always built on ½ the size of scale. If the regular style is 1 inch, the back is ½ inch. Copy the back part of the collar and cuffs to show the exact outlines of front. Continue with the fullness of the back around the waist so that it will harmonize also with the front.

LESSON NO. 30
STYLE OF SUIT
FRONT VIEW
In order to begin this suit, it is understood that the entire foundation is to be used, as the suit consists of a jacket and a skirt, which covers the entire body. Before beginning this style note the position of the foundation. Ihe position of this entire diagram shows a right hand view and to continue the style begin first with the jacket the following way. Situate the opening of the lapel in front according to your taste, which is this time with ½ space of the breast and the waist line. Then take about ½ of shoulder, which is shown at 5 and continue with the collar and notch lapel, lost to the buttoning place.
Note that 3 at the breast line is the opening, is closed, which shows that the center line from 3 to 4 is the guide to show how much ever lapping there is. Note extension at the collar all around the neck, which is shown at 9 and 10. The left hand lapel at 6 is, as a rule, built wider to show the side effect of the entire garment. At the right side we are showing the exact space of every part of the garment. The scallop and gathering at 7 and 8 shows ⅛ space between the waist and hip line.
The skirt part is built on the same fashionable outlines as the jacket to harmonize with the out-growing points regarding style and effect.

LESSON NO. 31
STYLE OF SUIT
BACK VIEW
This is the back view of the diagram shown before. Continue the finishing outlines of the back with the same style. Before going any further remember 2 things when showing the back view. 1. The back view is always shown on ½ size of original front sketch. 2. The back view continues the finishing points of style shown on the front view and always shows the finishing details of such back on a flat back view.
To carry out the finishing details of the back, continue the width of collar according to the front and judging the width of collar according to the width of shoulder as shown at 1, 2 and 3. At 4 and 5 are seams at the lower part of armhole. 7 and 8 is the waist line. 9 is above the waist line and the 2 opposite points are below the waist line. 10 is showing an open split by the 2 opening lines lost up to the hip line.
The forming of the bottom of jacket is shown somewhat short against the back, showing that this back is a long trail and gives the understanding that the front of this jacket is a cut-a-way front. The skirt part, as not having any particular outline of style, only continues the lengthening part as an ordinary outline

LESSON NO. 32
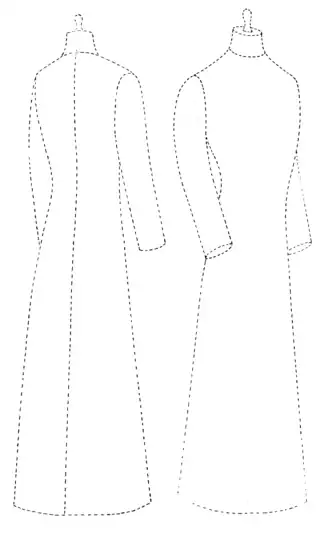
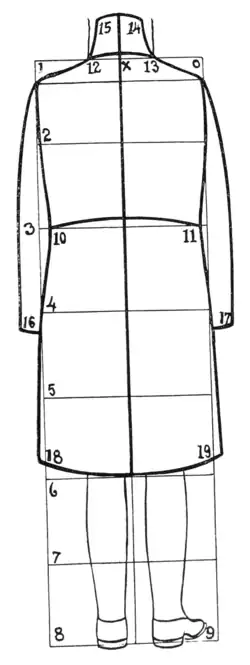
STYLE OF COAT
FRONT VIEW
Before beginning this sketch, note that the sketch is placed on a left hand side form and you may therefore refer for beginning instruction for such form on pages 44 and 45. When you are fully acquainted with such form continue with the style of the coat the following way.
Extend the collar around the neck at 11 and 12 and follow the width of shoulder as shown on diagram at 1 and 2. Continue with the lapels from 3 to 10 down to the opening place, which is about between the waist and hip line. At 1 there is no regular armhole shown but a yoke, which makes it a kimono effect coat.
Now continue the curving of the cut-a way front. Curve first the left hand side lost to 8 and note that the curve begins from the center line. The guide for the center line you may use from 12 to 9 down to the bottom by which you may also note at 9 lapping over for button stand. Then continue from 9 to 7, which will finish the right hand side.
Always remember when making a cut-away front make the inner side shorter looking and the outside, which is this time the left hand side at 8, longer. The pocket place according to this diagram is a trifle below the hip line, which may be used for all long coats. Sleeve lengths, as a rule should only come to the hip line.

LESSON NO. 33
STYLE OF COAT
BACK VIEW
In making a back sketch it should be remembered that the back, as a rule, is sketched flat to see the entire effect of the back. This rule may be changed in showing an important part of the side view, which happens very seldom.
Remember, it is not necessary to sketch the back the same size as the front, but only on ½ the size and we, therefore, make use of the ½ inch spaces for this back foundation which has already been explained in the last stylish back view for a suit.
To begin note at 1 and 2 is beginning the arm effect where the sleeve begins to show its effect. This back is showing a kimono effect coat and the yoke effect below 1 and 2 is about 2 inches below the armhole. 3 and 4 is at the waist line where it shows a trifle shapy effect. This gives an idea that this is not a full coat but a half fitting coat. Then extend the lost fullness towards the bottom from 3 to 5 and 4 to 6. Follow the curving at the bottom according to the continuation of the cut-a-way effect of the front shown before this.

LESSON NO. 34
PROPORTIONAL DETAILS ON MISSES SIZES
In beginning the section of misses' sizes proportional sketching, it is necessary to make a few remarks which are as follows: Remember that the misses' size of proportional outline of sketching is about the same as the women's size. The only part which we may have to change is to make the sketch a trifle shorter, which will not be much recognized on the sketch and therefore, does not pay to make this little change. It will be necessary for everyone who would like to know this trifle change to look on the beginning pages of this work where the height of each proportion is given and it will be found that the 16 which is the model size for misses' sizes, measures in height 5 feet 4 inches, which means 2 inches shorter than the total height.
The waist length ½ inch shorter, the skirt length is 1¼ inches shorter and balance of the 2 inches amounts to ¼ of an inch decreased in the head space. In order to simplify this action, it would be necessary for sketching misses' sizes to take somewhat smaller space for equal proportions of sketching, which means instead of 1 inch make use of ⅞ of an inch space and the entire diagram is smaller in proportion.
Follow rules as before with exception when making a full length garment dress, suit or separate skirt to show the skirt is worn shorter than the women's size. Otherwise, follow proportions as shown on opposite diagram and use rules as explained before for further diagrams for misses' sizes.

LESSON NO. 35

FOUNDATION BLOUSE FOR MISSES' SIZE
In order to begin proportional outlines for misses' sizes draw the same lines as for women's sizes as diagram shown above. Remember the little difference that the space between 1 and 2, 1 and 7 and 2 and 8, which is an even square of 1 inch used for women's size. For misses' size may be used ⅛ of an inch smaller to decrease proportionately the outcome of misses' size body for blouse, waist or jacket which means if these boxes will be decreased proportionately they will show the proper feature for misses' sizes. See next lesson for further instruction.
LESSON NO. 36

COMPLETE RIGHT HAND FRONT VIEW
MISSES' SIZE
This foundation represents the front, right hand side view for misses' size 16, which shall be conducted the same as the women's model which is shown in the front pages of this book. The space at all points shall be proportionately divided according to the outlay of its original box lines. For instance, 7 which is showing the height of bust should always be half space between the center and edge lines or the space at 6 shall increase the bust, which is always ⅛ of an inch. Use all other details according to instruction by which a complete and proportional outline will be obtained.
LESSON NO. 37

BACK VIEW OF BLOUSE
MISSES' SIZE
To begin back view, draw your ordinary outline of 4 equal boxes proportionately for misses' sizes as explained for misses' proportions. Then divide equally the space between the upper top line and the lower line, which appears at 1 and 2 and draw slant lines in for the neck from 2 to 8 and from 1 to 7, as shown on the diagram.
Connect shoulder lines from 1 to 4 and 2 to 3. 3 and 4 are ⅛ of an inch in from the straight line. Then divide on the bottom line, between the edge line and the center line on both sides half space, which makes 9 and 10 and the space between 9 and 10 is the original width of back at the waist line making the proper space for belt at the waist line. This makes it ready for continuation with the next lesson.
LESSON NO. 38

MISSES' SIZE
BACK VIEW Complete.
In order to complete the back view, it is now necessary to continue the curving of shoulders for the sleeves from 1 down to 7 and 2 down to 8. The space of curve is 7 and 8, which is about ¼ of an inch extended from the original outline of the box which always means ⅛ of the box space, which we use for sketching.
The sleeve length of this sketch is situated according to the full length of the waist, which reads to 7 and 10 and 8 and 9. The space between 7 to 10 and 8 to 9 is about ½ inch or ½ of the box space, and connect to 18 and 19 for the underarm space, which is about ½ space between the waist line and breast line and then it is necessary to make a round curve from 1 to 3 and 2 to 4. Be careful and study these curves as they are the most important part in sketching. The belt effect between 3 and 5 and 4 and 6, you will notice is about ¼ of an inch for 1 inch space of sketching.
LESSON NO. 39
PROPORTIONS OF JUNIORS' MODEL
In order to begin the junior model, memorize that we are always to make use of 15 as the model size for juniors'. The cut on the opposite page shows the proportionate outlines of such model, by which we can tell the growing height of every proportion of the body, especially, the length of the skirt or dress, which a junior may wear.
On the front pages of this book you will find the proportional total height for this particular size and it is not necessary for us to employ a different method for juniors' sizes than the method that we use for women's or misses' sizes.
See the next lesson for further instruction.

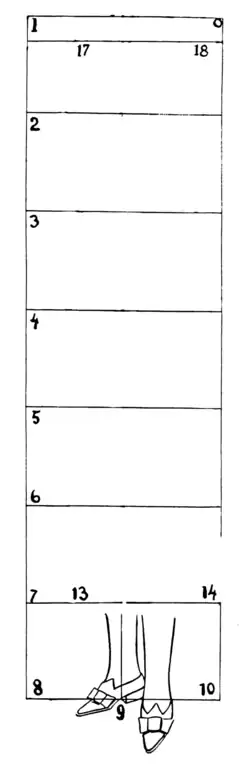
LESSON NO. 40
JUNIORS' MODEL
BEGINNING OUTLINES
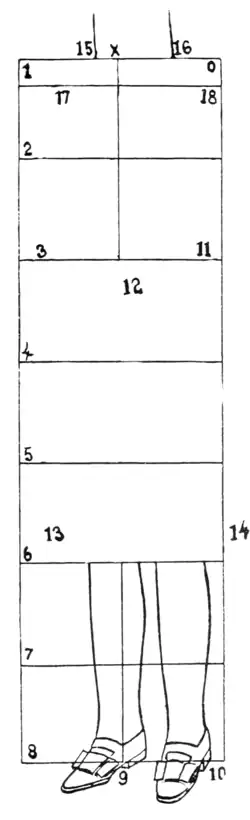
In order to begin juniors' model foundation for the entire body, which may be used for a dress, suit or coat, we are to employ the entire foundation from the neck to the ground and then we are to deduct the space between the length of such dress, suit or coat to the ground which you may notice on the opposite diagram where the drawing of feet are shown, which is the last space of the foundation from 7 to 8 and 14 to 10.
The foundation lines for the entire body is equally divided into 8 sections the same as the women's and misses' sizes with the only exception that this space is shorter as the entire height of bcdy is shorter. The amount of the entire height of the junior body you will find on page 7 of this book and note that 15 is to be the model size for juniors' and the height is 5 feet and 1 inch.
The line at the upper space below 1 and 0, which is located at 17 and 18 is already preparing for the shoulder height, which is to be continued on the next diagram. The outline of feet drawing at the bottom space between 7 and 8 and 14 and 10 is showing that this diagram is to be continued as a front foundation and will be continued as such in the next lesson.
LESSON NO. 41
JUNIORS' FRONT MODEL COMPLETE
The complete juniors' model, which can be used for either dress, suit or coat continue as follows: Divide the space on the top line from X to 0, which makes 16 and draw a line up. From X to 15 take ¼ of the space between X and 1. Draw a line up and curve the neck somewhat narrower on top. Make from 16 to 18 for the left shoulder and from 15 to 17 for the right shoulder, 17 is half of box space and curve a trifle forward all the way down to the sleeve, from 17 down to the hip line, which is 4. Continue curving 17 to 12 a trifle in at the waist and continue down to 13 for the entire length of the garment. The length for juniors’ garments is shorter than the total height.
Continue the armhole for the left side from 18 down to the hip and for the length of the sleeve a trifle curvy. Then make side curve and begin about half way between breast and waist lines curving in at 11 to the waist line to show a distinction of waist and curve down to 14 for the full side length. Increase the curve at hip line, which is 4 and draw the line straight down to 14, which is the bottom. Curve the outside length of sleeve from the shoulder tip of 18, curving somewhat round and full till reaching the ending part of the sleeve which rests on the hip line at 4. The heavy line in front of neck at X indicates the center of neck. Continue somewhat curving all the way down straight to the waist and down to the bottom. Note necessary curves at neck and waist. Curve from 15 to 16 downwards and at the waist from 11 to 12 downwards towards the bottom to show the effect of the front action, which is to be always a deep curve.

LESSON NO. 42
JUNIORS' MODEL
BACK VIEW
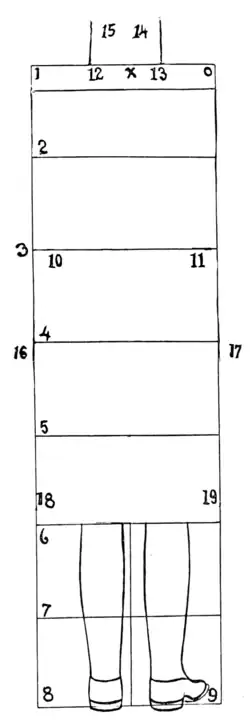
In beginning foundation for the back view draw foundation lines as the front. The feet drawing at the bottom will show as a continuation which will be contiuued in the next lesson. The shoulder line, which is below line 1 and 0, at 9 and 1 is also preparing the same way for the resting place of the shoulder.
The only difference there may be between the front and back foundations is that the back shoulder will be equally divided as the back, as a rule, is shown in a flat position.
See next lesson for further instruction.

LESSON NO. 43
JUNIORS' MODEL
BACK VIEW Complete.
In completeing the back view of juniors' model note that the back is shown in a flat position. Both sides of X, on the top line, to 12 and 13 is ¼ of the box space. Draw a line up from 12 to 15 and 13 to 14 half of the box space, which will entirely build the foundation of the neck. Now connect from 12 to 9 and 13 to 10 for both shoulders alike and note that 9 and 10 is ¼ of the box space in from the straight outlines. Then continue with a curvy line from 9 to 16 and 10 to 17 to the waistline and from 11 to 16 and 17 is full half spaces each side from 11, which gives a trifle shapy waist effect. Continue with a trifle increase of curve to the line below, which is the hip line and down the straight lines for the full length of garment from 16 to 18 and 17 to 19.
The space between line 7 and 8 is ⅛ of the total height, which is left unclothed as this is about the space showing the proper length of garment necessary for juniors' model size 15. Continue the outgrowing effect for sleeve and full round effect beginning at the shoulder point at 9 and 10 and to stop exactly on the hip line, which is 4. Make the inner curve of the sleeve somewhat curving out to follow the effect of outside sleeve curves and to stop on the hip line as shown on the diagram. Carefully note the difference between the neck and hip curve in front and back as follows: The curve at the neck for the back part from 12 to 13 is curved upwards and the same way curve the waist effect from 16 to 17.

LESSON NO. 44
CHILD'S MODEL
BEGINNING FRONT OUTLINES
To begin the child's model foundation lines for the entire body, which may be used for dress, coat or suit we are to employ the entire foundation from the neck to the ground as shown in juniors' sizes which will show a difference between the juniors' and child's body. Note the difference in height and that the very same spaces are used in equal divisions with one difference, that the spaces are somewhat shorter built for the child's model.
To begin foundation lines draw lines as usual and use spaces about ⅛ a of an inch shorter than spaces for juniors' sizes between 1, 2, 3, 4, 5, 6, 7 and 8 and you will find 7 equal spaces. Whatever amount of spaces you decide to make for child's outline from 1 to 2, etc. make the double spaces in width from 1 to X and X to 3. The line below 1 and 0, which is at 12 and 13 will be the resting line for the shoulder points. Take special notice of the important details necessary for child's size, which are as follows:
On a juniors' foundation ⅛ of the total height is raised from the bottom line up, which is from 8 to 7 showing the proper length of dress or coat. For child's size you will find two-eighths of the height, which is from 8 to 6, shows that for child's sizes, dress or coat, is to be a great deal shorter, whereby, the length of such garments will reach somewhat below the knee. This is important and should be carefully remembered in sketching outlines for children's garments.
LESSON NO. 45
CHILD'S FRONT MODEL COMPLETE
In completeing a child's front foundation continue sketching for the body foundation as follows: Complete the neck by dividing about ½ space from 0 to X, which makes 16 and from X to 15 is ¼ of the space between X and 1. Curve immediately from 15 to 16 and both sides of the raising lines from 15 to 16 curve slanting way in for the neck part. Then make the round circle at top for the neck, as shown on the diagram.
From 1 to 17, which is showing the shoulder point, is about, ⅓ space in. Connect from 15 to 17 and 16 to 18 with a full or a trifle increased amount to the outside line, which is drawn from 0 to 10. Continue the right hand sleeve from 17 with a medium outward curve somewhat below the hip pass 4. The left hand sleeve, which is beginning from the shoulder point at 18 straight down towards 11 below hip line and the outside curve is made full from 18 lost somewhat below as shown on the diagram.
Then continue to curve the same hidden from the arm for the full length and width of coat or dress down to 14 and the right hand side from 17 down somewhat curvy at 3 out and somewhat fuller to 13 and then make a bottom curve from 13 to 14, which completes the length of this foundation. Make a waist effect curve from 3 to 12 and 11, as shown on the diagram to show the low waist effect which is similarly curved to the collar, as shown to 15 and 16. Otherwise, this foundation is complete.

LESSON NO. 40
CHILD'S MODEL
BACK VIEW
The child's back foundation is similar to the one showing the front with one exception that the neck lines are equally placed on this foundation, which is shown on both sides of X at the top line to 12 and 13, which means that the back foundation is always to be drawn flat and not side effect as the front.
In addition to the same, this diagram shows the position of feet showing the back part only or an action towards the front and note the same on the diagram. Great care should be taken in this matter to recognize the front or back view correctly by the action of the feet. Watch both diagrams of the front and back and you will then note the difference
LESSON NO. 47
CHILD'S MODEL
BACK VIEW Complete.
To complete the back view for a child's foundation, immediately raise the shoulder point from 12 to 13 to the line below 1 and 0, for which that line is particularly used. Curve the neck at 14 and 15 somewhat slanting in from the straight line and curve round effect upwards from 12 to 15 and 13 to 14. Continue curving the body from the shoulder point down from 1 to 10 and to 11 a trifle shapy and continue to the bottom to 18 and 19 as shown on the diagram. At the same time note the difference between this and the juniors' size, which is a great deal more curved at the waist line. It will tell you that the child's garment is supposed to have a fuller effect in the waist.
The sleeves for the back foundation are alike. Begin from the shoulder and full effect curving to 16 and 17, which is a trifle below the hip line. The inner seam of the sleeve of this diagram is not noticeable because it is hidden by the full effect of the waist. The sleeves are showing the action towards the front. Otherwise this diagram is complete.
LESSON NO. 48
INFANT'S MODEL
FRONT FOUNDATION
In beginning infant's front foundation for the entire body which may be used for a dress or a coat, we employ the entire foundation from the neck to the ground as shown in the child's size. Note the difference in height, each space is somewhat less than the child's size. It is immaterial what space is used for the child's body sketch, for the infant's we use ⅛ less to make the foundation look shorter in order to correspond with the age of the child.
Otherwise divide the spaces as usual. For the full length garments which is to be the dress or coat is to be built to the knee which is similar to the child's model. The outline is to be followed according to the instruction of child's model with the exception which is mentioned above. Otherwise the difference between the child's and infants model is very trifle.

LESSON NO. 49
INFANT'S MODEL
BACK FOUNDATION
To complete the back view for the infant's model foundation immediately draw the same foundation as for the child's model with the difference as mentioned in the front that each space is to be ⅛ less than the child's. Otherwise all rules and regulations for body sketching are to be about the same with the exception that when a style is to be built on top of this foundation, the style of garment may be built somewhat fuller in width which is an important action in infant's garments.
In order to fully understand the necessity of describing the infant's model height it would be advisable to see the front pages of this book where each model size is specified under a different height by which we may learn the difference in height for each and every different model.

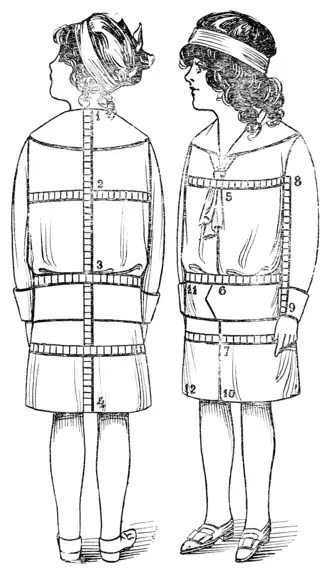
STYLISH CHILD'S MODEL
On the opposite page you will find cut showing front and back view of child's stylish model, from which we learn the following outlines:
The child's dress is built on a loose form. If it is a dress or a separate blouse and skirt, the length of the total garment reaches only to the knee and the waist effect, as a rule, shows below the waist line, although this rule may be changed from tine to time according to whatever style there may be.
When copying styles see that the entire action of the front view shall be transacted the same way at the back which may be referred to the fullness of blouse at the waist or the style of collar. Take into consideration the collar effect, the both look alike, the front and back. You will note the additional stripes shown. Either 2 models give a direct outline of how to follow measurements for child's garments or where the proper place of such measurements are taken
ORIGINAL IDEAS
To originate new ideas, it is somehow or other something not everyone can do, but in order to obtain such method, I will herewith give a few points on the topic, which may enlighten those who are interested to produce something of their own. To begin something of our own we must go to work and begin something entirely different from anybody else and we need to know or think of a certain foundation that such style of garment is to be built on, which may be similar to the music writer. The words and the action of a song may be new but the melody is probably not entirely new. The melody is the foundation of its draft and no doubt that such melody is not supposed to be a simple copy of some other song, if the song is supposed to be a new one, but somehow or other, it is a connection of some other tune and what is new is the words and actions. We are about in the same position to obtain something new which may be called our own original outlines We first have to create in our mind what we are to make up and then build such style. I positively warn everyone not to do anything unless he has a foundation of some kind of outline as no house of standard work is built without any foundation. It is therefore necessary to remember many other principle points to go on with this original work.
Before starting such production, make a record of the following details: What is your garment supposed to be; a blouse, jacket, coat or cape. Length of your garment, length of sleeves. What style of fitting. What style of front, single or double breasted. Style of lapel or collar, if the garment is supposed to be lay-over, button-up collar or collarless. Cuffs or no cuffs on sleeves. Style of pockets and flaps. How many pockets shall the garment contain, how many buttons and button holes and what style or size. How shall the lengths of the garment be cut, if cut-a-way front with round back or straight bottom.
After you have completed such record, you are about ready to begin to make the foundation of your pattern. Now decide or particular remember the size of your model sizes that you have to use and see particularly if the style of garment you are to originate is suitable for that model size or section for all sizes, which you may originate, as it is important to remember that some styles will be practical for women's and misses' sizes and will not be practical for any other smaller sizes as junior's children's and infant's Therefore, decide well before making this important step and see that your time will not be wasted.
LENGTHS FOR ALL MODEL PATTERNS
In order to make suitable lengths for model sizes, we need to look into this matter a great deal differently than producing lengths for size 36. To begin it is first necessary to see about misses' sizes, which the model size is 16 and may be followed according to the size 36. Remember when deciding about lengths for different sizes, it is necessary to look upon the different heights of the different model sizes, as they are a great deal shorter in length, especially the junior's children's and infants' sizes. In the front page of this book the proportional height for each model size is given and follow that rule in conjunction with the style for each and every season because the lengths of garments may be controlled by the style.
At the same time there is another thing to remember when speaking of styles, the length of garments may be controlled under 3 different outlines which are as follows: Height of form, size of garment and style. These may be connected with the following suggestions. When referring to model sizes, especially, misses', junior's, children's and infant's we are to look upon the age and then the height and size. Use these points to serve as a protection of not misleading the great importance of knowing correct lengths for all kinds of women, misses's, junior's, children's, and infant's garments.

This cut represents the natural looks of a skeleton foundation of a kimono, which is for filling in of style as may be required from time to time.
INDEX
| Page. | |
| Title | 1 |
| Introduction | 5 |
| Problem of Garment Sketching | 6–7 |
| Proportions for Body Sketching | 8–9 |
| Blouse Beginning Foundation | 10 |
| Blouse Foundation Continued | 11 |
| Blouse Foundation Continued | 12 |
| Blouse Front View complete | 13 |
| Blouse Left Hand Side View | 14 |
| Back View of Blouse | 15 |
| Back View continued | 16 |
| Back View complete | 17 |
| Back View Left Hand Side | 18 |
| Back View Right Hand Side | 19 |
| Style Blouse Sketching | 20–21 |
| Stylish Blouse Back View | 22 |
| Skirt Foundation | 23 |
| Skirt Foundation complete | 24 |
| Skirt Sketching in Different Views | 25 |
| Skirt Right Hand Side View | 26–27 |
| Skirt Left Hand Side View | 28–29 |
| Skirt Back View | 30–31 |
| Skirt with Trail Effect | 32–33 |
| Stylish Skirt Sketch | 34–35 |
| Complete Foundation for Dress or Suit | 36–37 |
| 2nd Complete Foundation for Dress | 38–39 |
| 3rd Complete Foundation for Dress | 40–41 |
| Dress Right Hand Side View | 42–43 |
| Dress Left Hand Side View | 44–45 |
| Dress Complete Back View | 46–47 |
| Complete Dress Right Hand Back View | 48–49 |
| Complete Dress Left Hand Back View | 50–51 |
| Dotted Outline Foundation | 52–53 |
| Stylish Dress Foundation | 54–55 |
| Style of Suit Front View | 56–57 |
| Style of Suit Back View | 58–59 |
| Style of Coat Front View | 60–61 |
| Style of Coat Back View | 62–63 |
| Proportional Details on Misses' Size | 64–65 |
| Misses' Size Blouse Foundation | 66 |
| Misses' Blouse Right Hand Front View | 67 |
| Misses' Blouse Back View | 68 |
| Misses' Blouse Complete Back View | 69 |
| Proportions of Juniors' Model | 70–71 |
| Juniors' Model Beginning Outlines | 72–73 |
| Juniors' Front Model Complete | 74–75 |
| Juniors' Model Back View | 76–77 |
| Juniors' Model Back View Complete | 78–79 |
| Child's Model Beginning Front Outlines | 80–81 |
| Child's Front Model Complete | 82–83 |
| Child's Model Back View | 84–85 |
| Child's Model Back View Complete | 86–87 |
| Infant's Model Front Foundation | 88–89 |
| Infant's Model Back Foundation | 90–91 |
| Stylish Child's Model | 92–93 |
| Original Ideas | 94–95 |
| Lengths for All Model Patterns | 96 |
| Kimono Sketch Foundation | 97 |

![]()
This work is in the public domain in the United States because it was published before January 1, 1930.
The longest-living author of this work died in 1965, so this work is in the public domain in countries and areas where the copyright term is the author's life plus 59 years or less. This work may be in the public domain in countries and areas with longer native copyright terms that apply the rule of the shorter term to foreign works.
![]()
Public domainPublic domainfalsefalse